Well it has been a crazy last week of March. We got snow. A record. The nights are still freezing but are starting to creep out into garden planting weather. I did manage to put in radishes and transplant my kales into cups. Growing transplants can save you weeks of time.
This is what my garden look like a week ago. I am currently pulling out dead debris and should have some new posts up next week around rabbit proofing and planting cool weather crops in the garden.
I woke up to snow.
An Unexpected Snow - The Rusted Garden Blog
The Plastic Cups Became Igloos - The Rusted Garden Blog
How to Build a Garden Slug Beer Trap (My 2010 Garden was Hit Hard by Slugs)
Slug and Snail Garden Damage - The Rusted Garden Blog
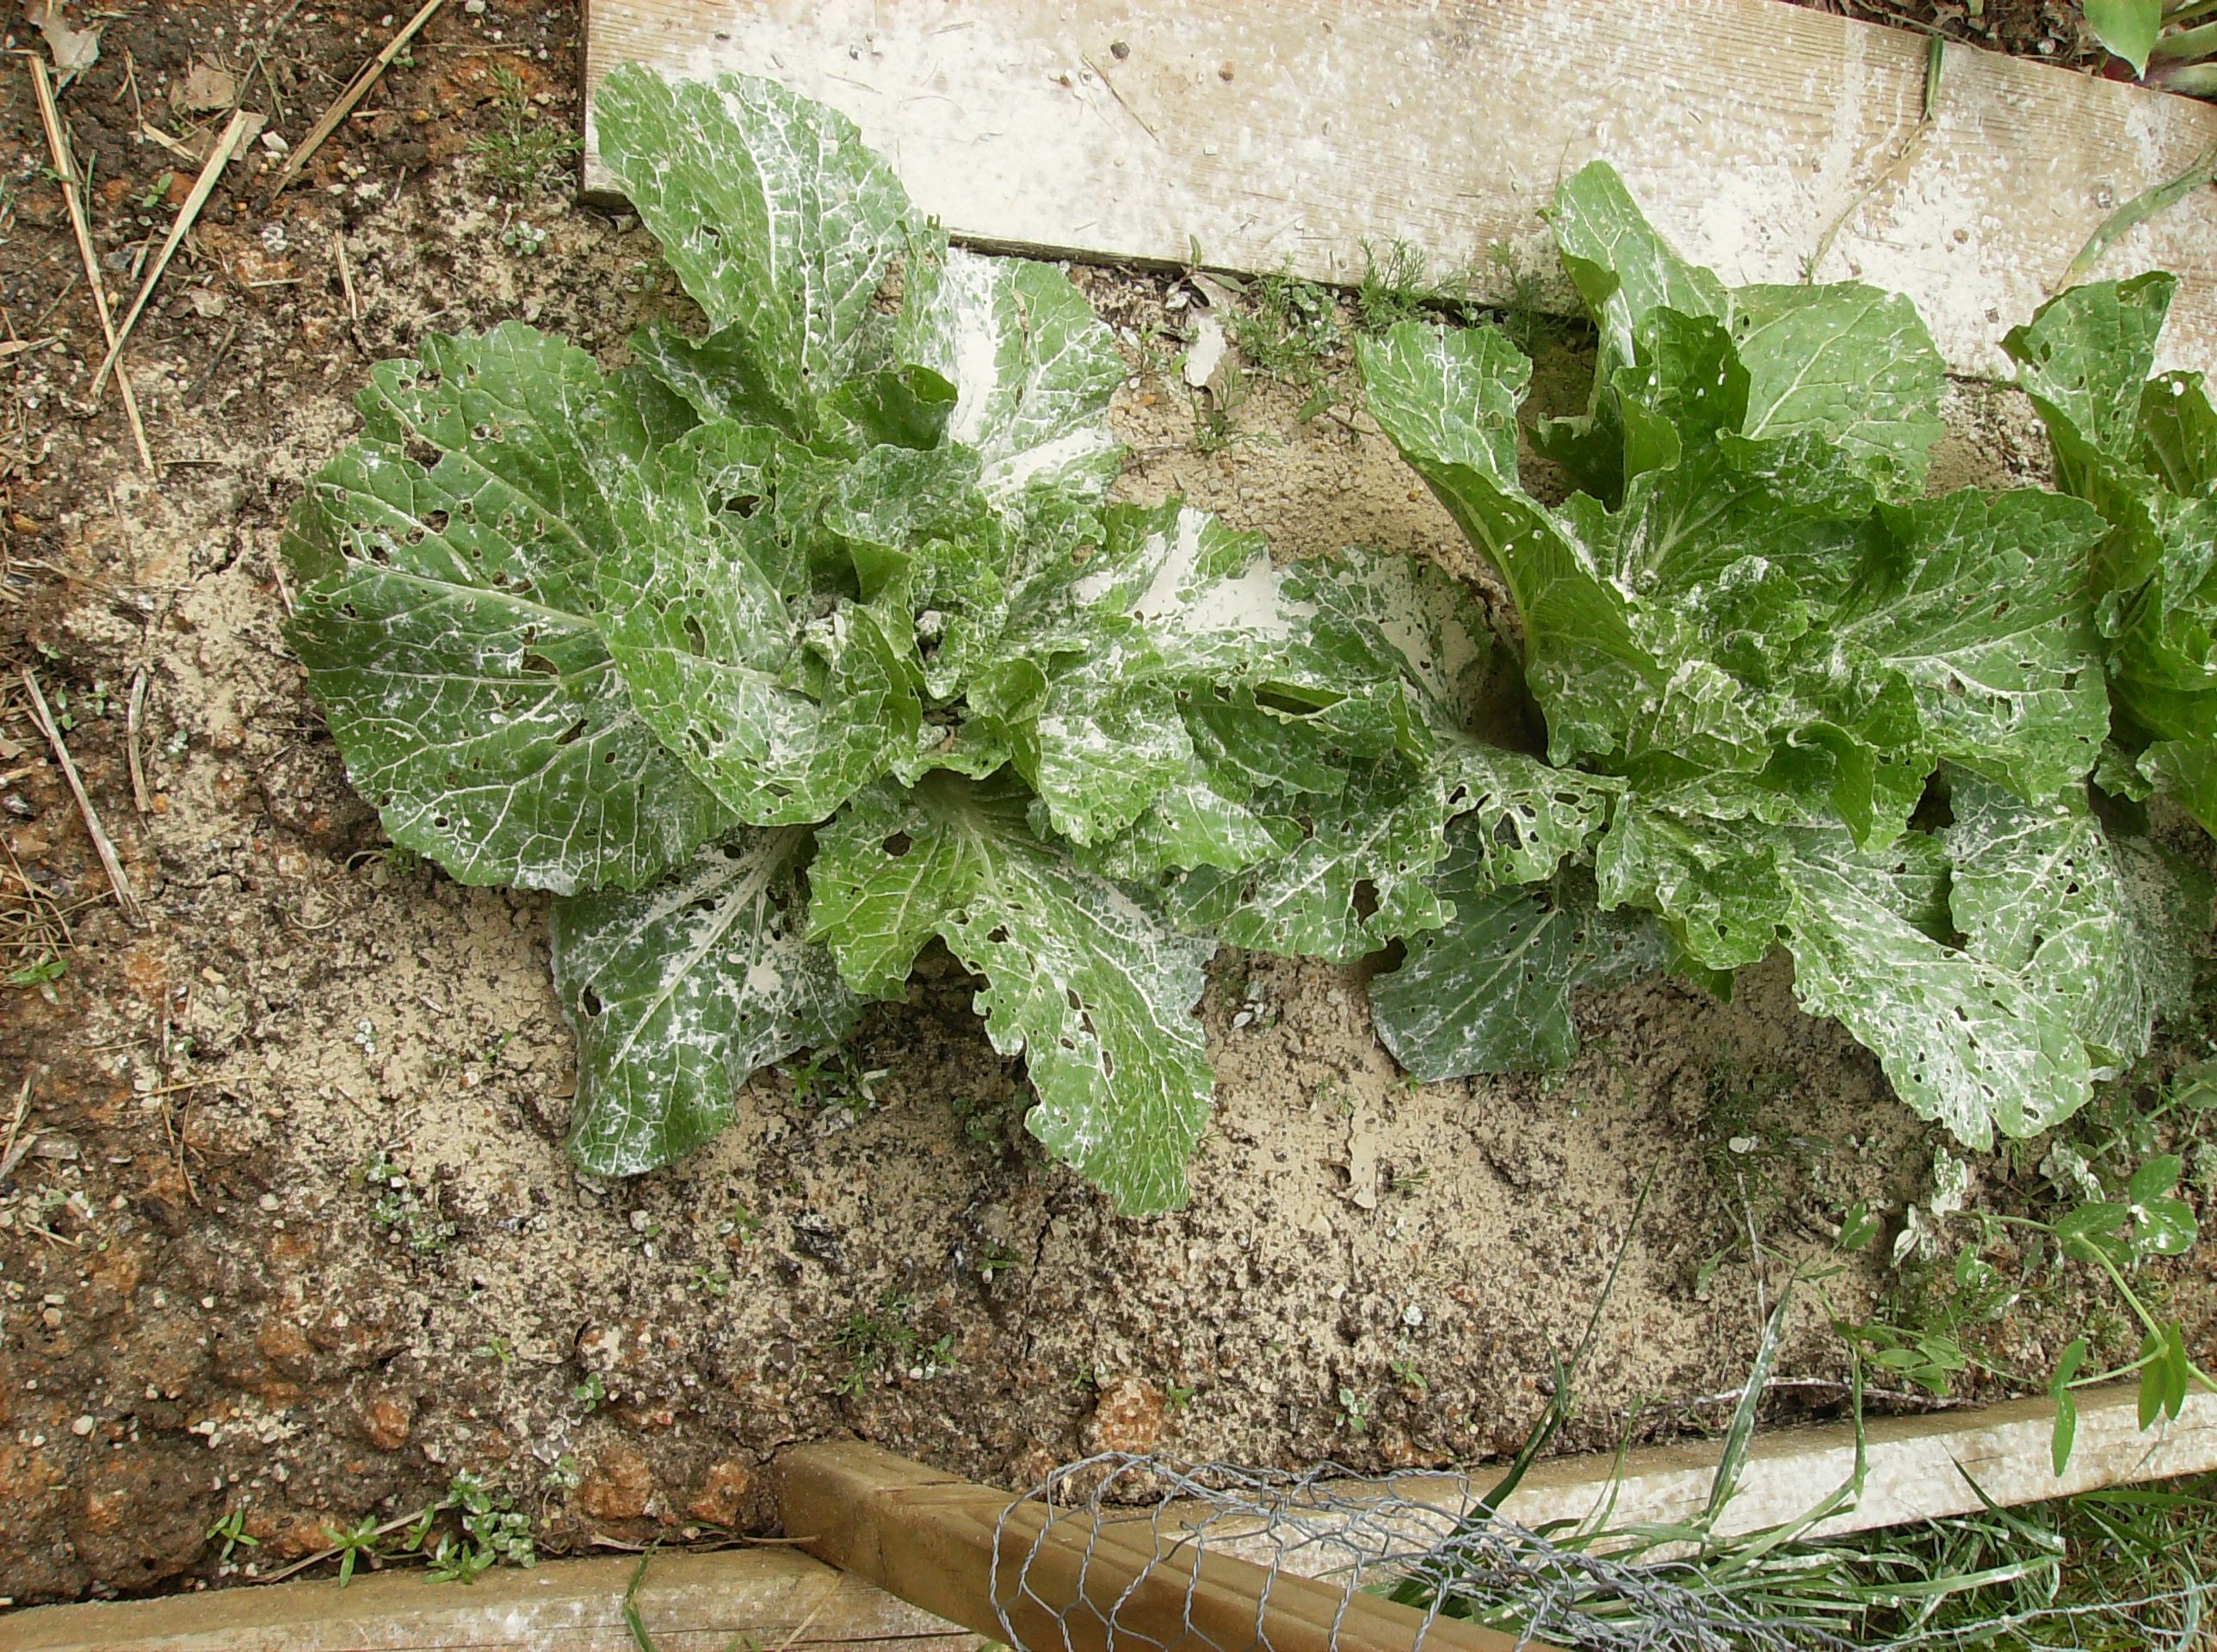
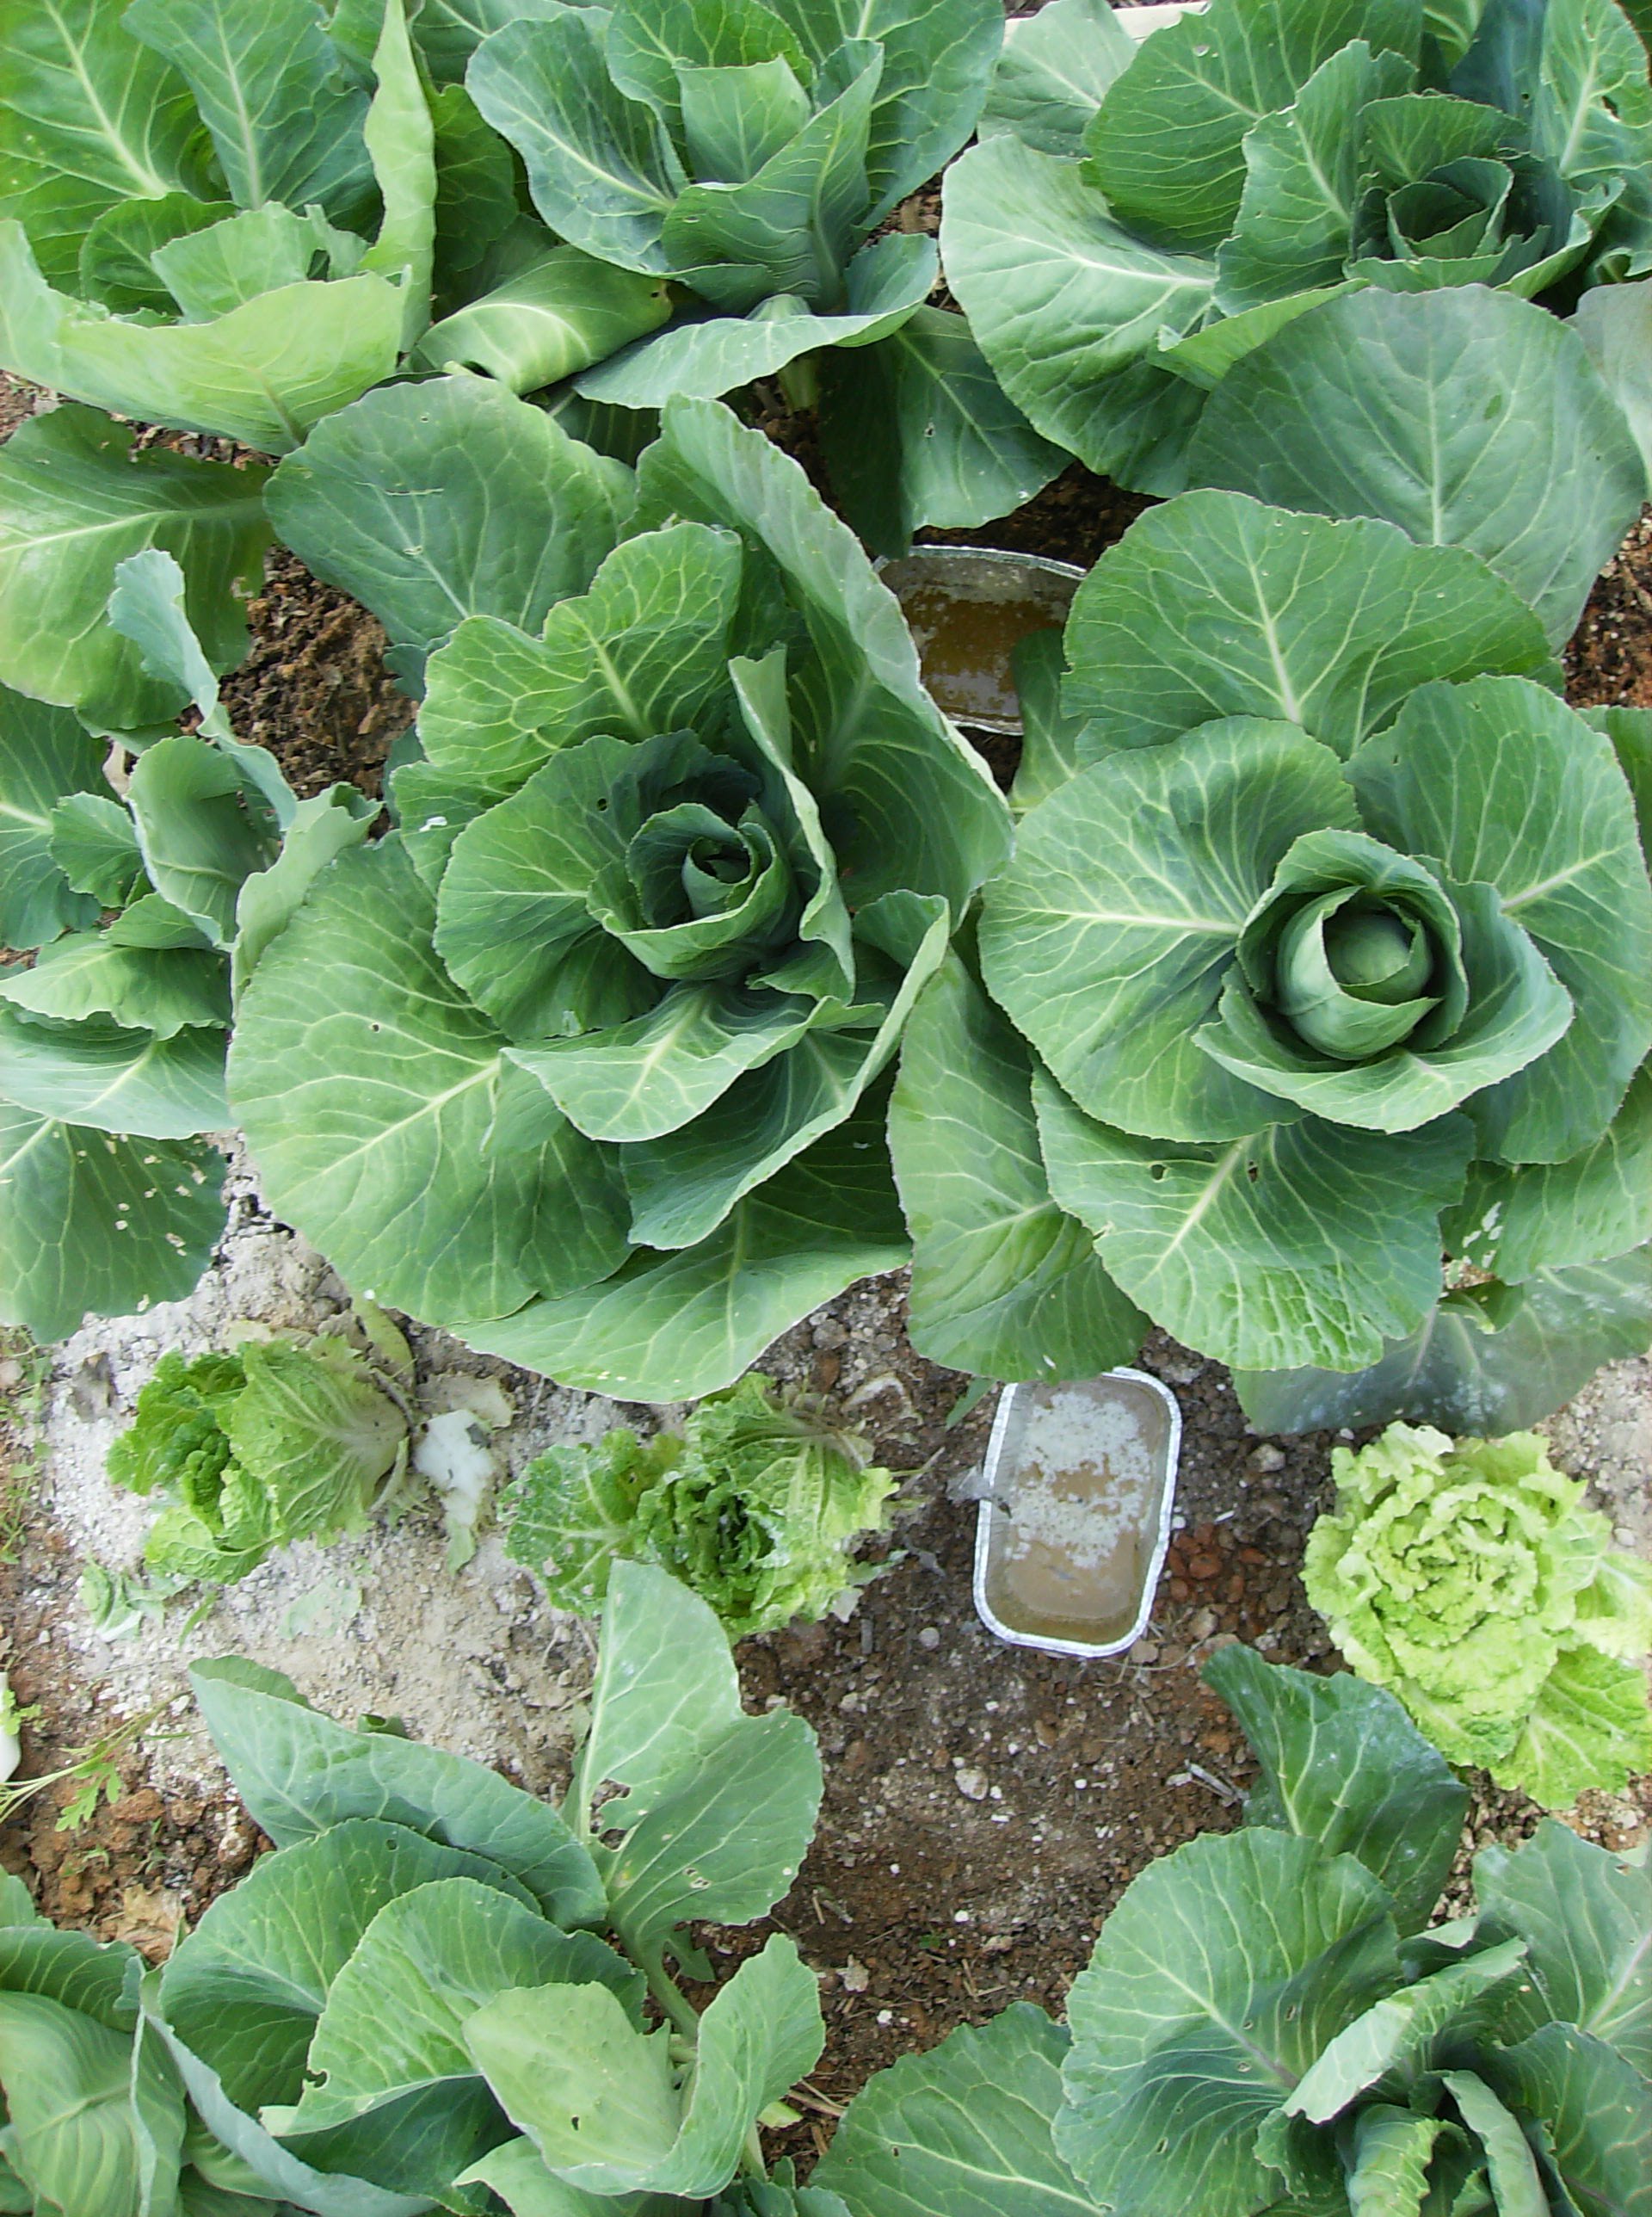
The evidence is my Bok Choy! Bok Choy!. No it's not a war cry to attack and destroy slugs. It is the casualty. All the holes in the leaves are from snails and slugs. You will notice coarse sand around the base. It didn't help. You will notice pulverized lime on the leaves. It didn't help. So I added beer traps.
The truth is... managing slugs in the garden takes a multiple step approach. I also recommend the use of iron phosphate along with slug traps. The goal is to greatly reduce the numbers of snails and slugs in your garden.
The Slug Beer Trap Supplies:
Slug Beer Trap Supplies - The Rusted Garden Blog
You can purchase foil tins at your local grocery store. The shape and depth of the tins doesn't really matter. I suggest tins that are 1 - 3 inches deep. Any bottle of beer and some yeast is also needed to build the trap.The slugs are attracted to the yeast. A little extra yeast sprinkled in with the beer helps to bait the trap.
Selecting the Trap Location:
Damaged Garden Vegetables - The Rusted Garden Blog
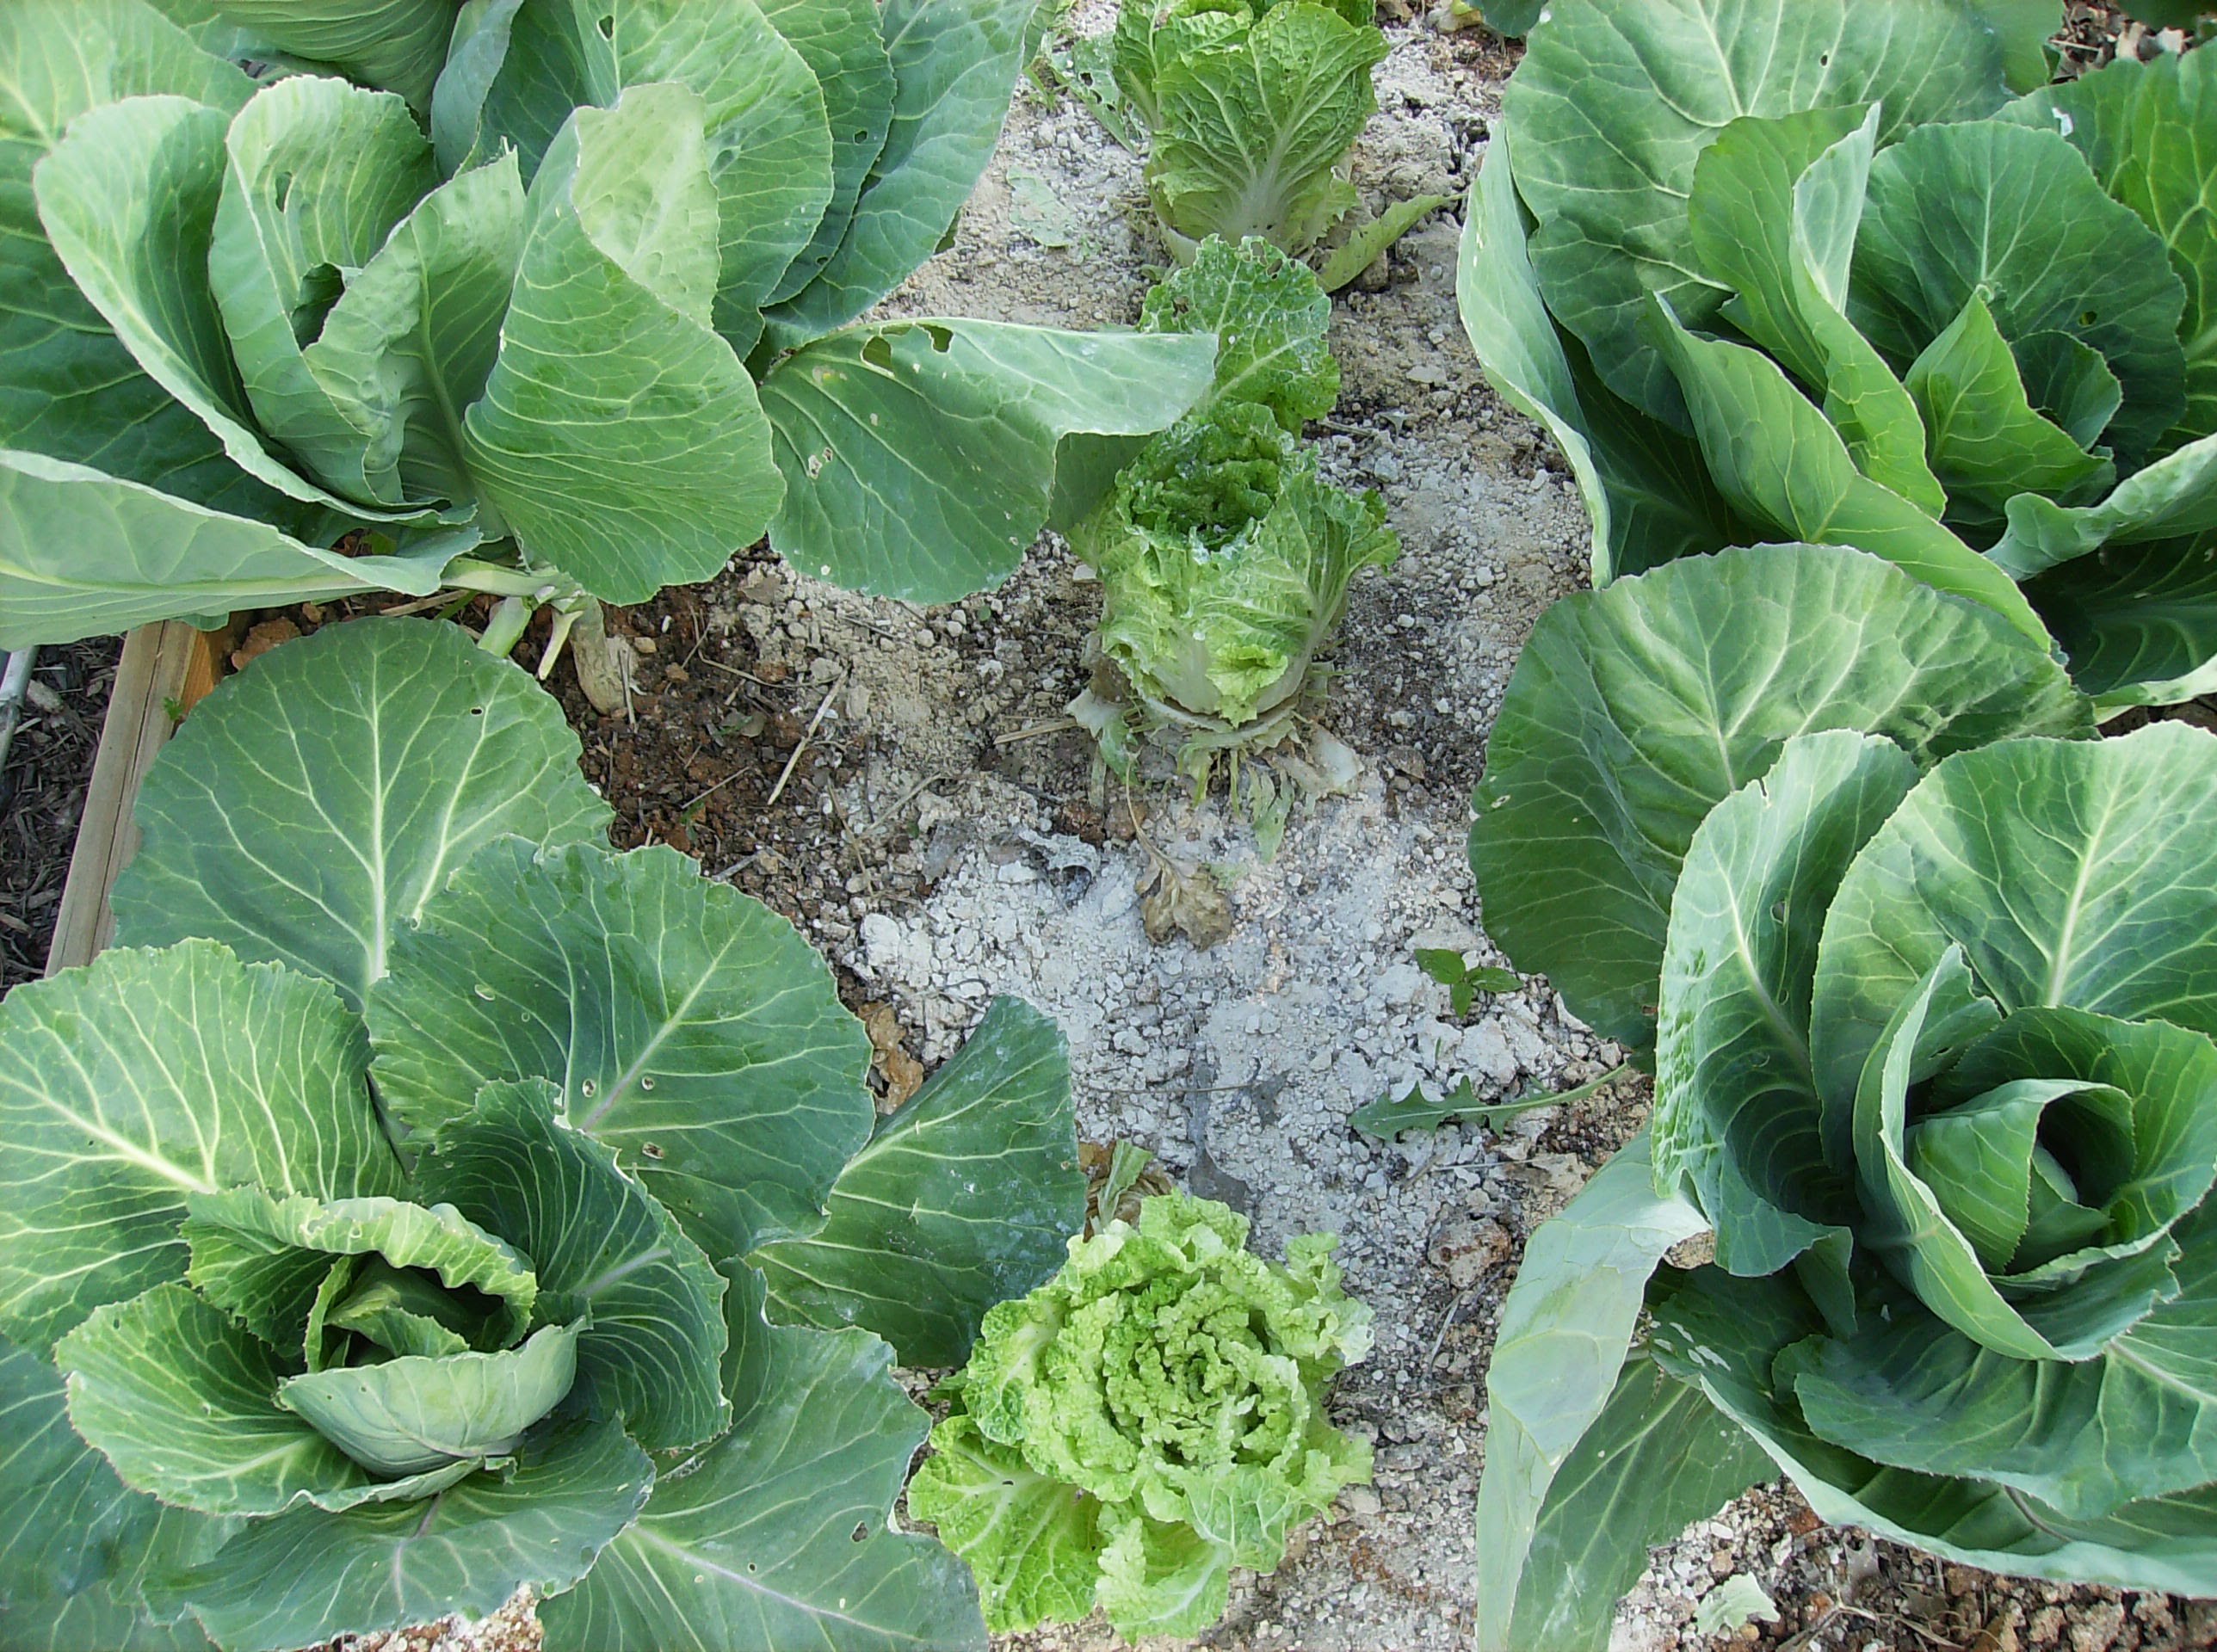
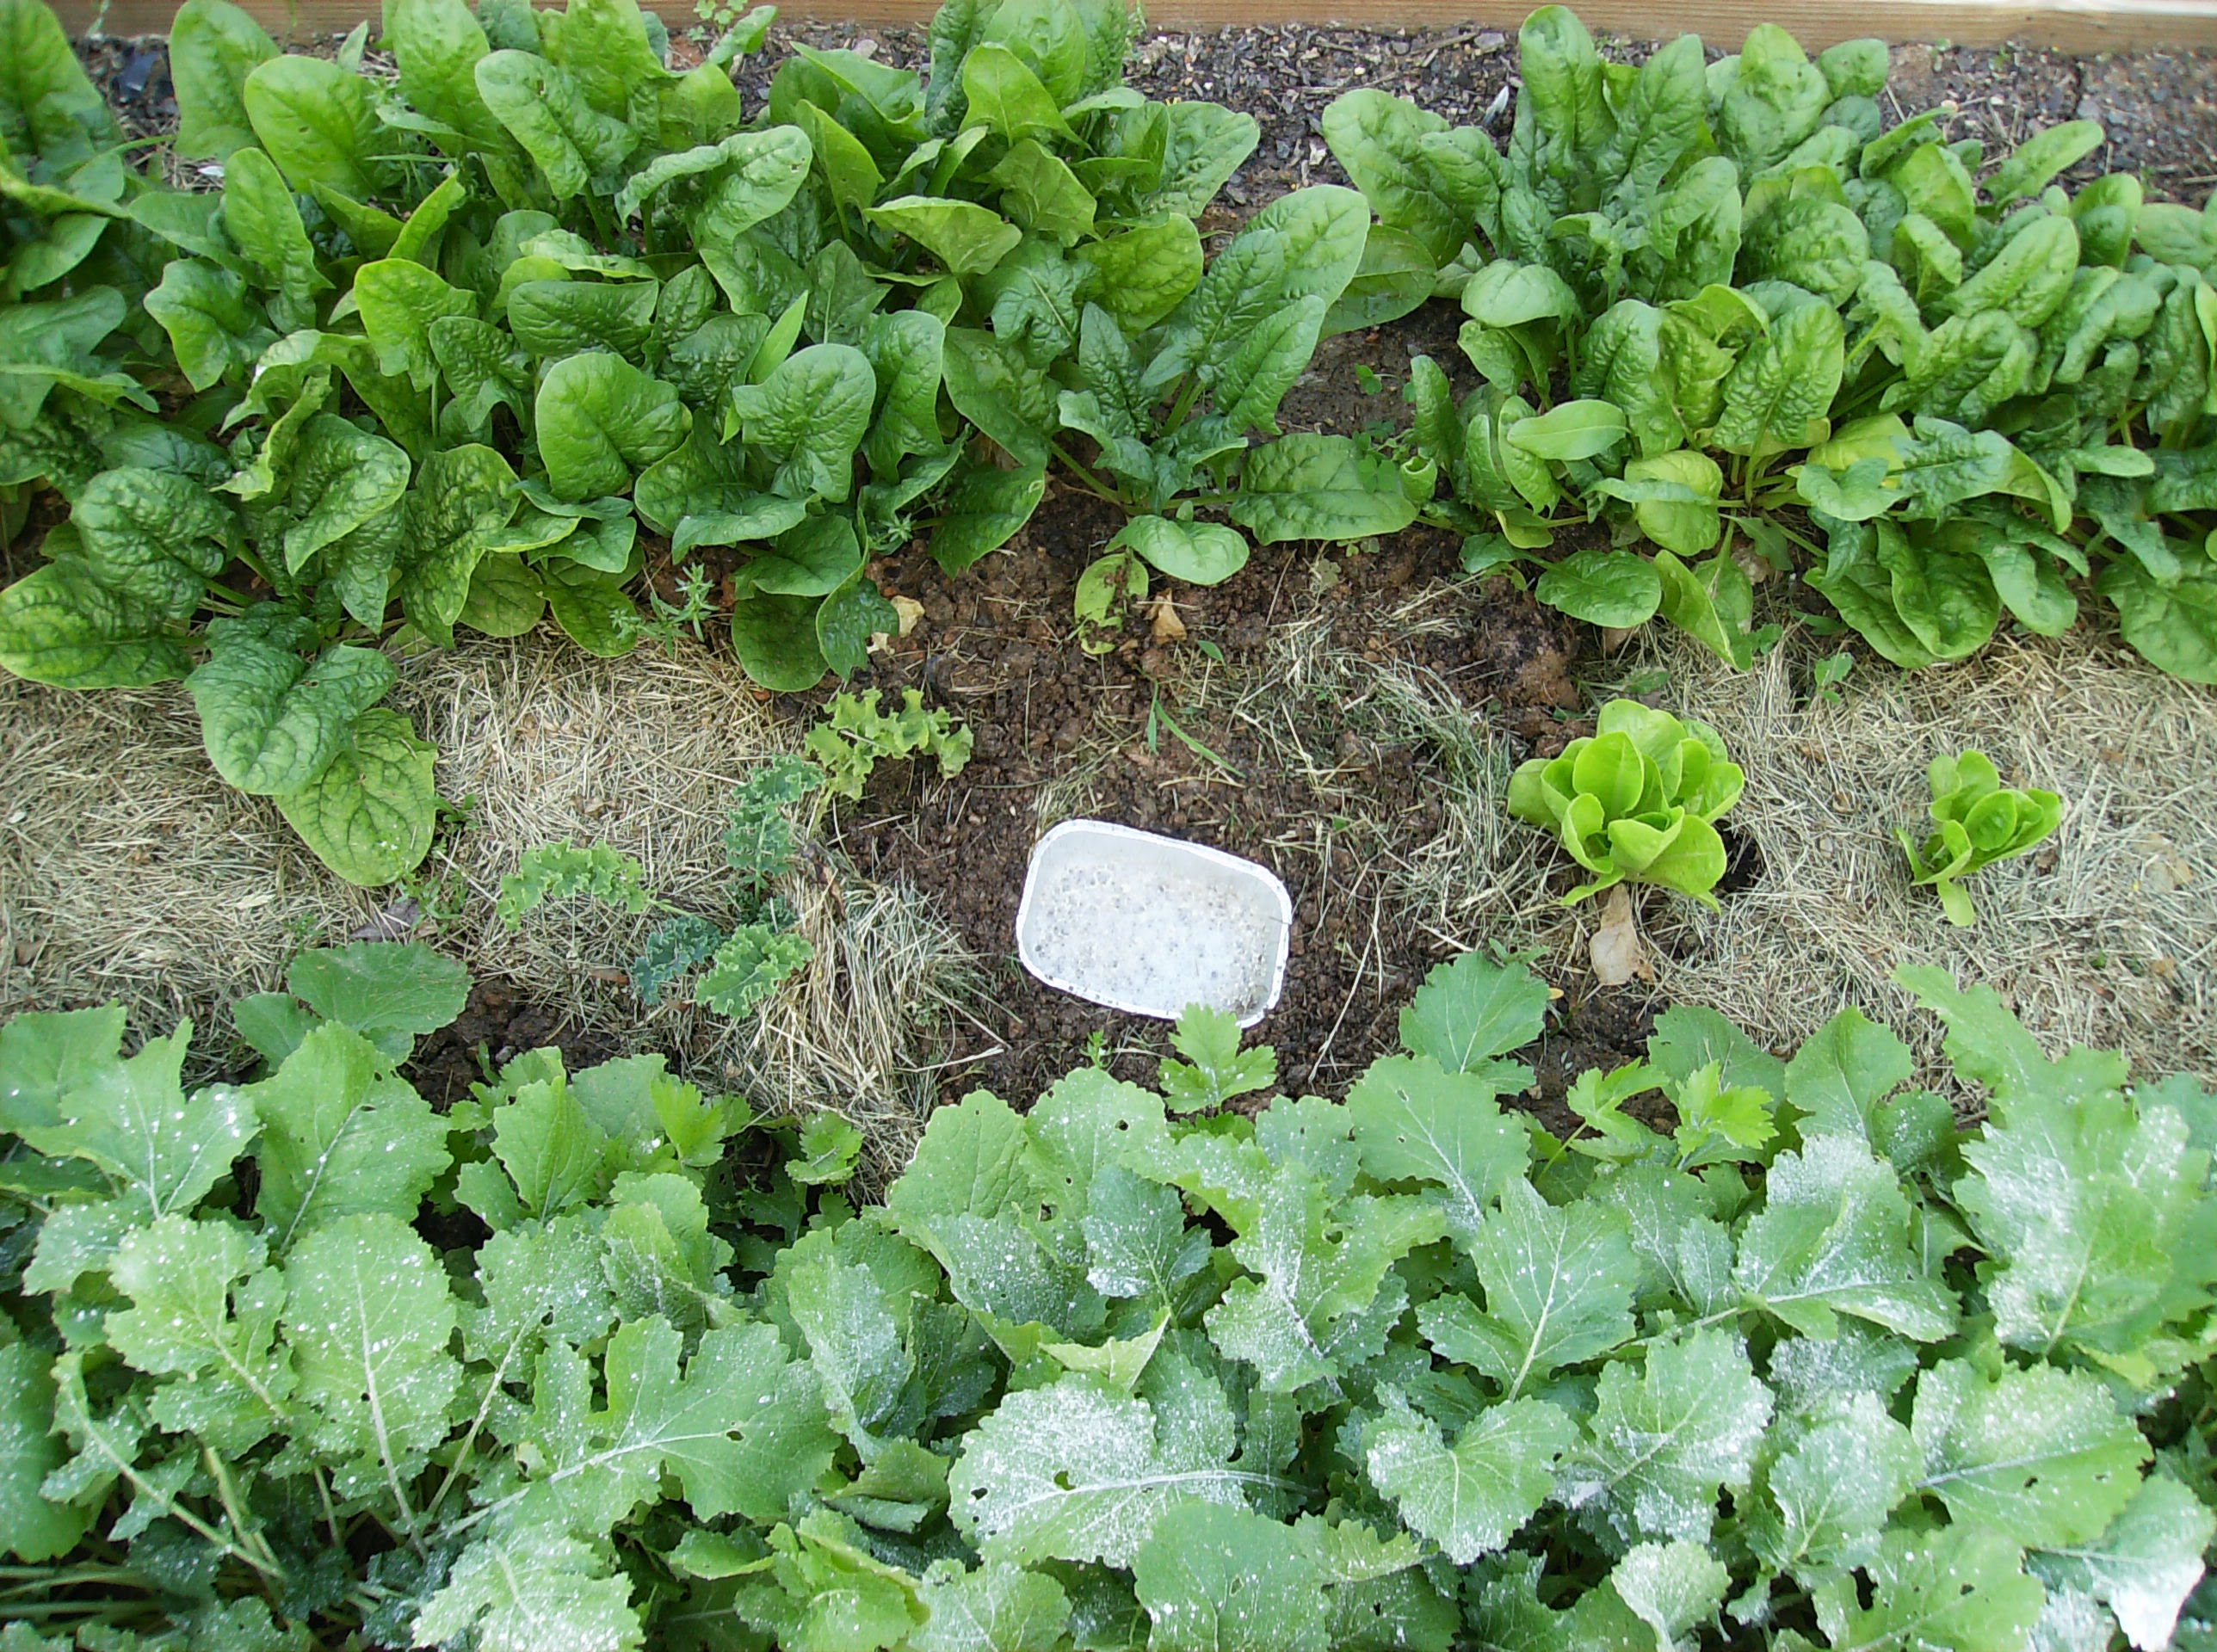
Select a location that is fairly close to the crops you want to protect. I tried protecting the above vegetables with coarse sand. The heads in the middle are Bok Choy or Chinese Cabbage. They were fiercely attacked by the slugs and I am keeping them as a casualty crop. I let the slugs attack them and they pay less attention to my other crops. Right between the cabbages is where I will build the beer trap. By the way... sand does not work!
Placing the Beer Trap:
Place the Slug Tin - The Rusted Garden Blog
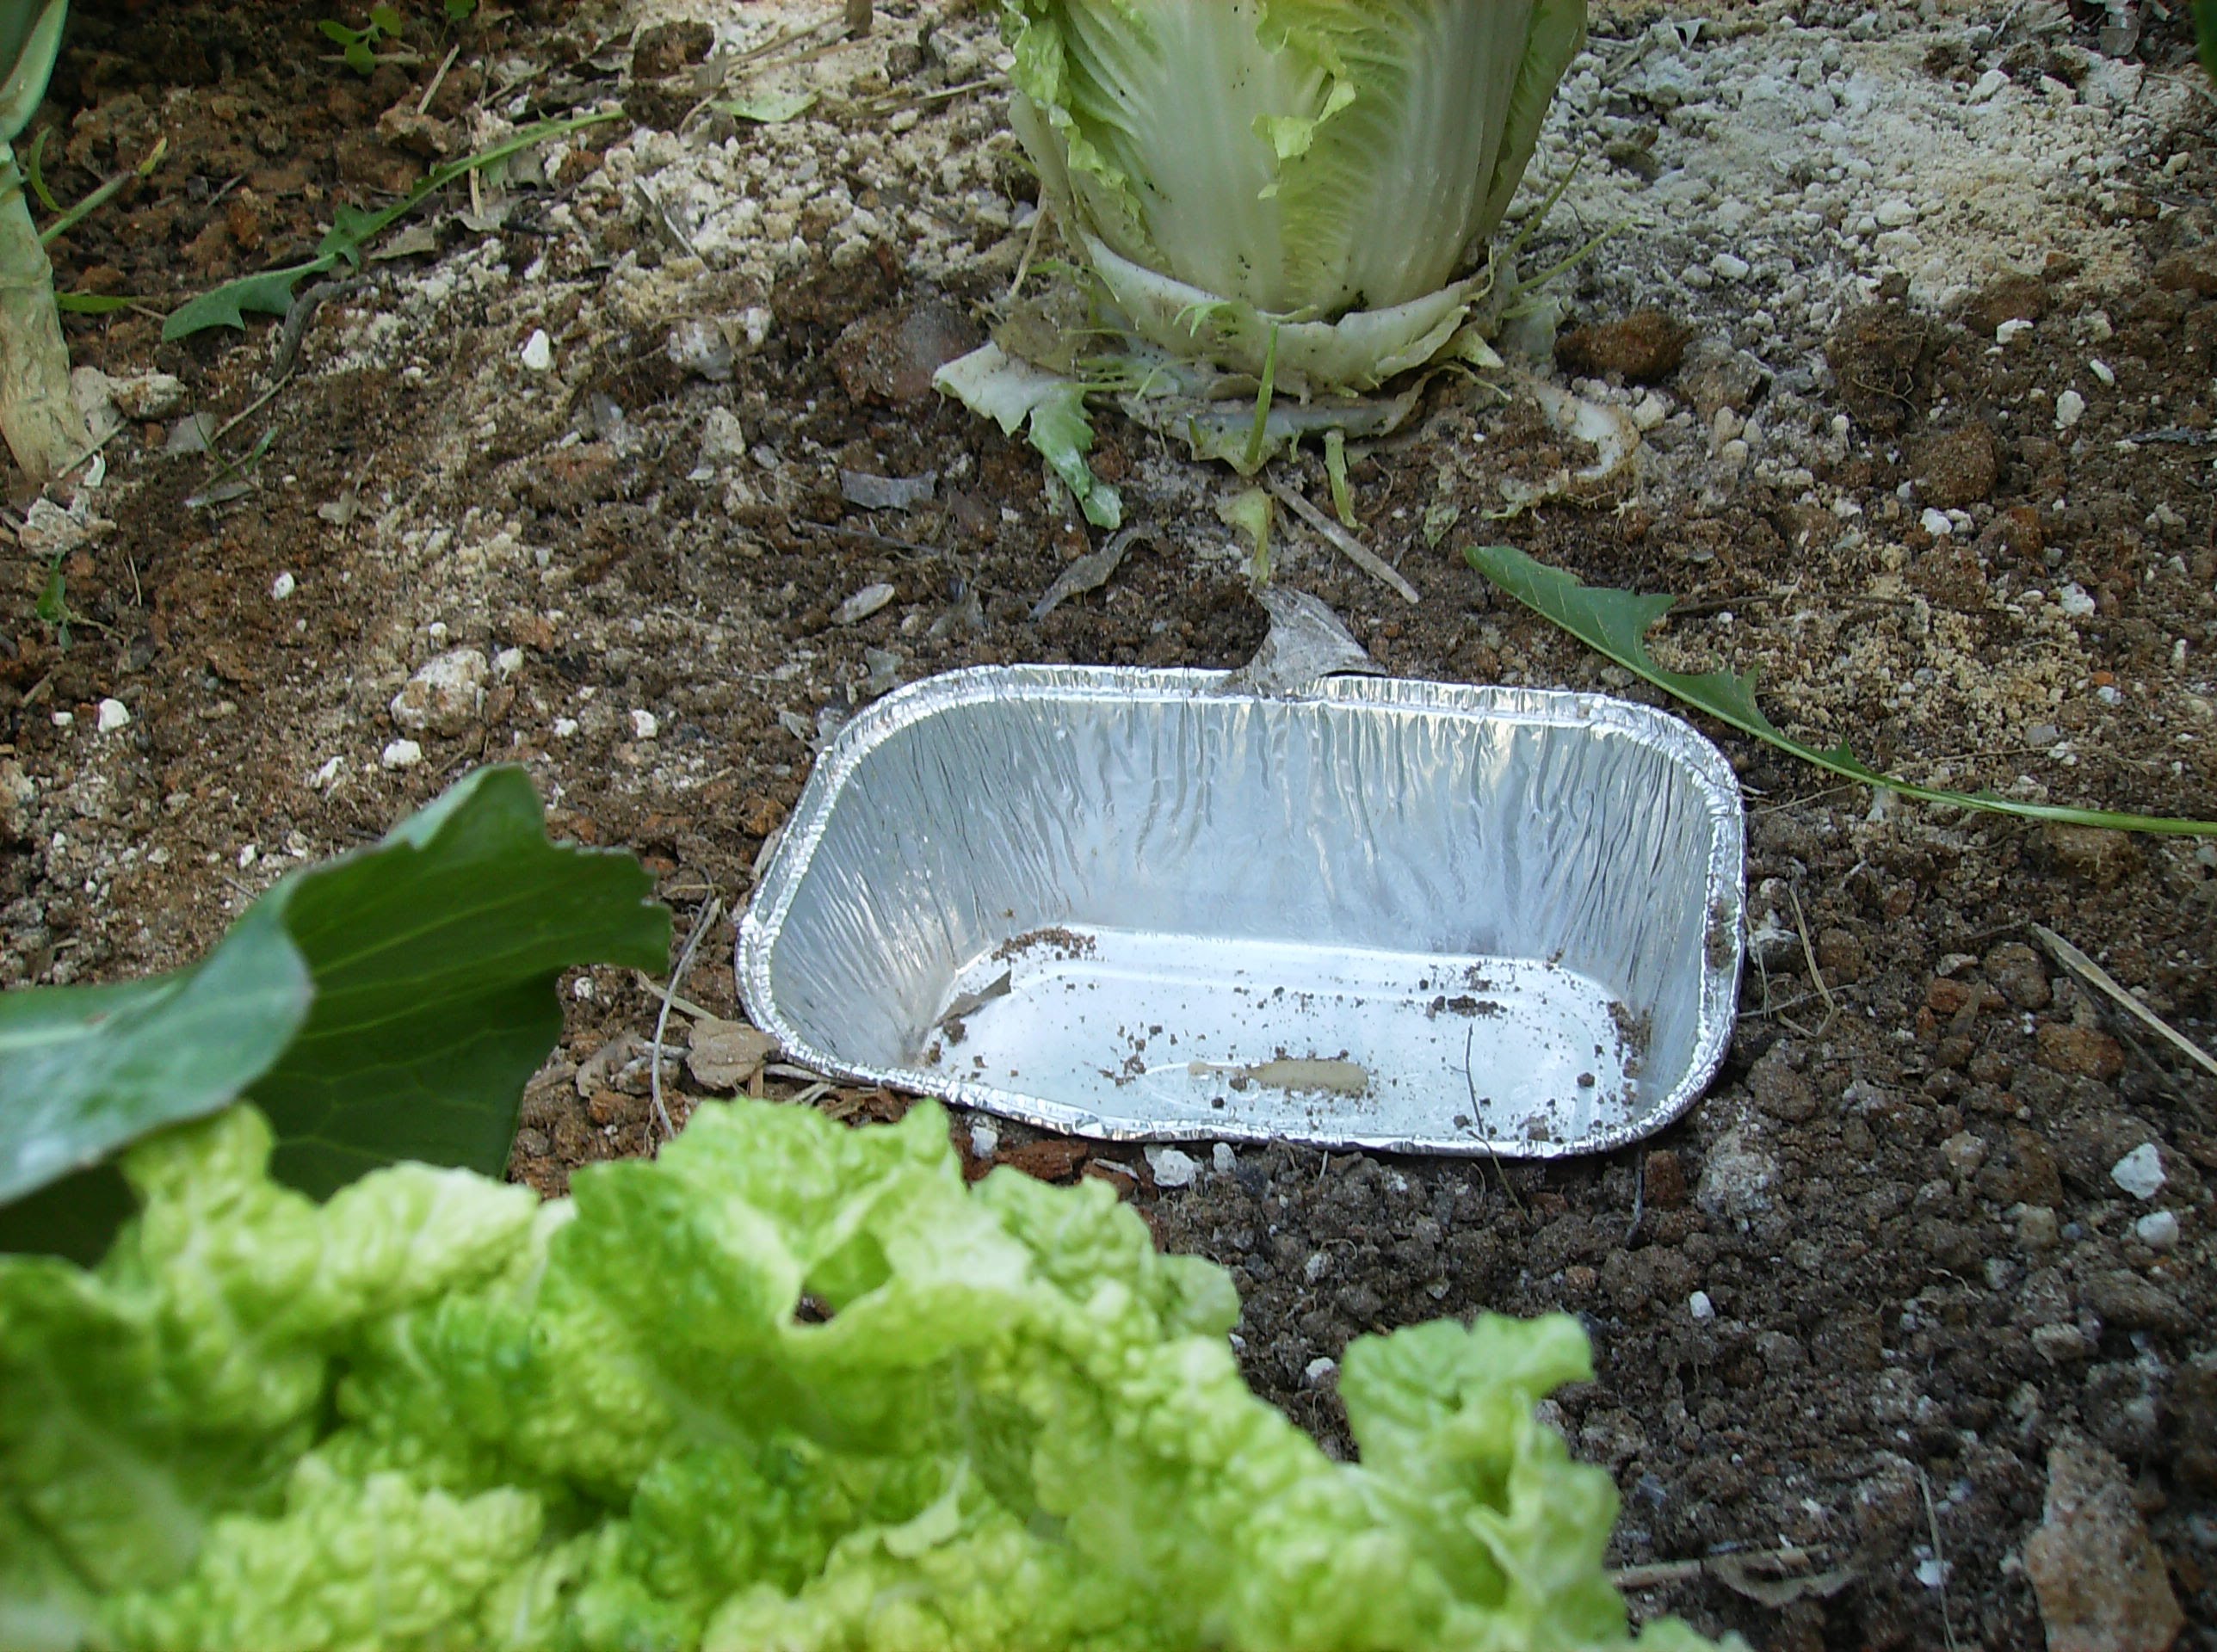
There isn't much to say but dig a hole and drop the tray in. The edges of the tin should be flush with the garden soil. You want it to be easy for the slug to crawl or fall into the trap. Once they fall in, they drown.
Baiting the Trap:
Baiting the Slug Trap - The Rusted Garden Blog
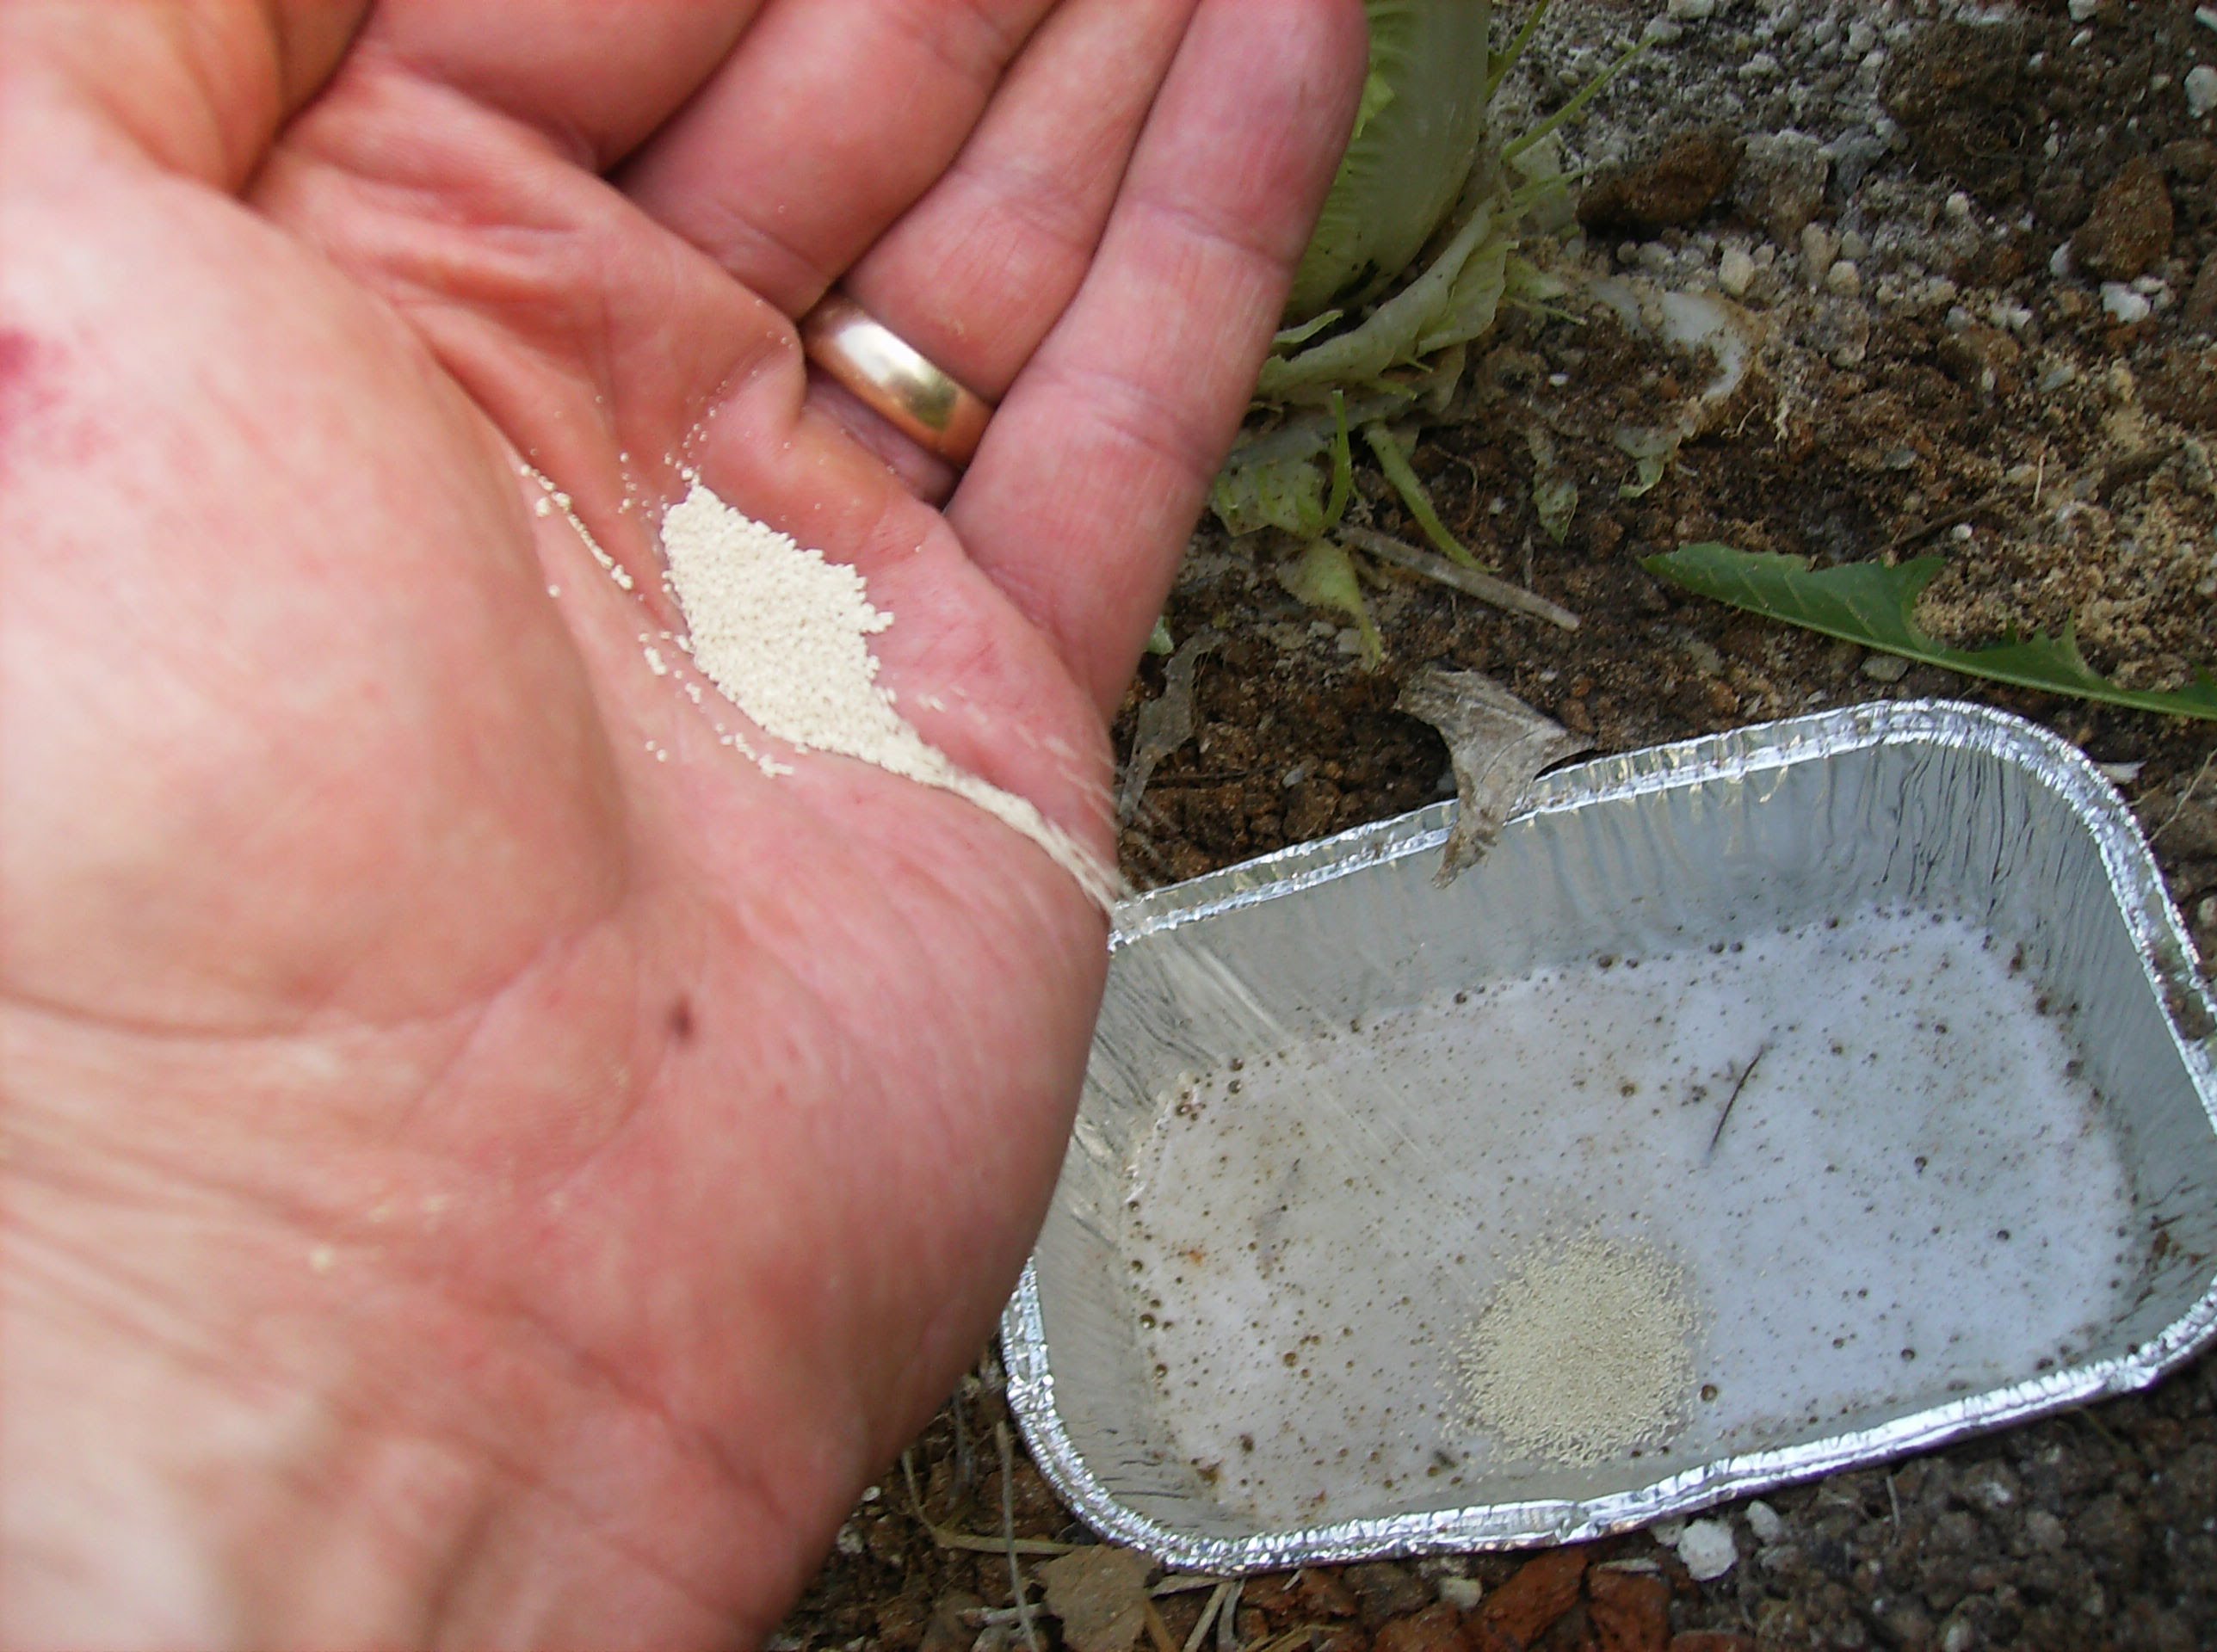
Fill the trap about 1/2 the way full with beer and drop in a bit of yeast. The trap is set. Remember the yeast helps attract the slugs and snails to the beer trap.
My Trap Locations:
Spinach and Parsnip Bed - The Rusted Garden Blog
The Cabbage Bed - The Rusted Garden Blog
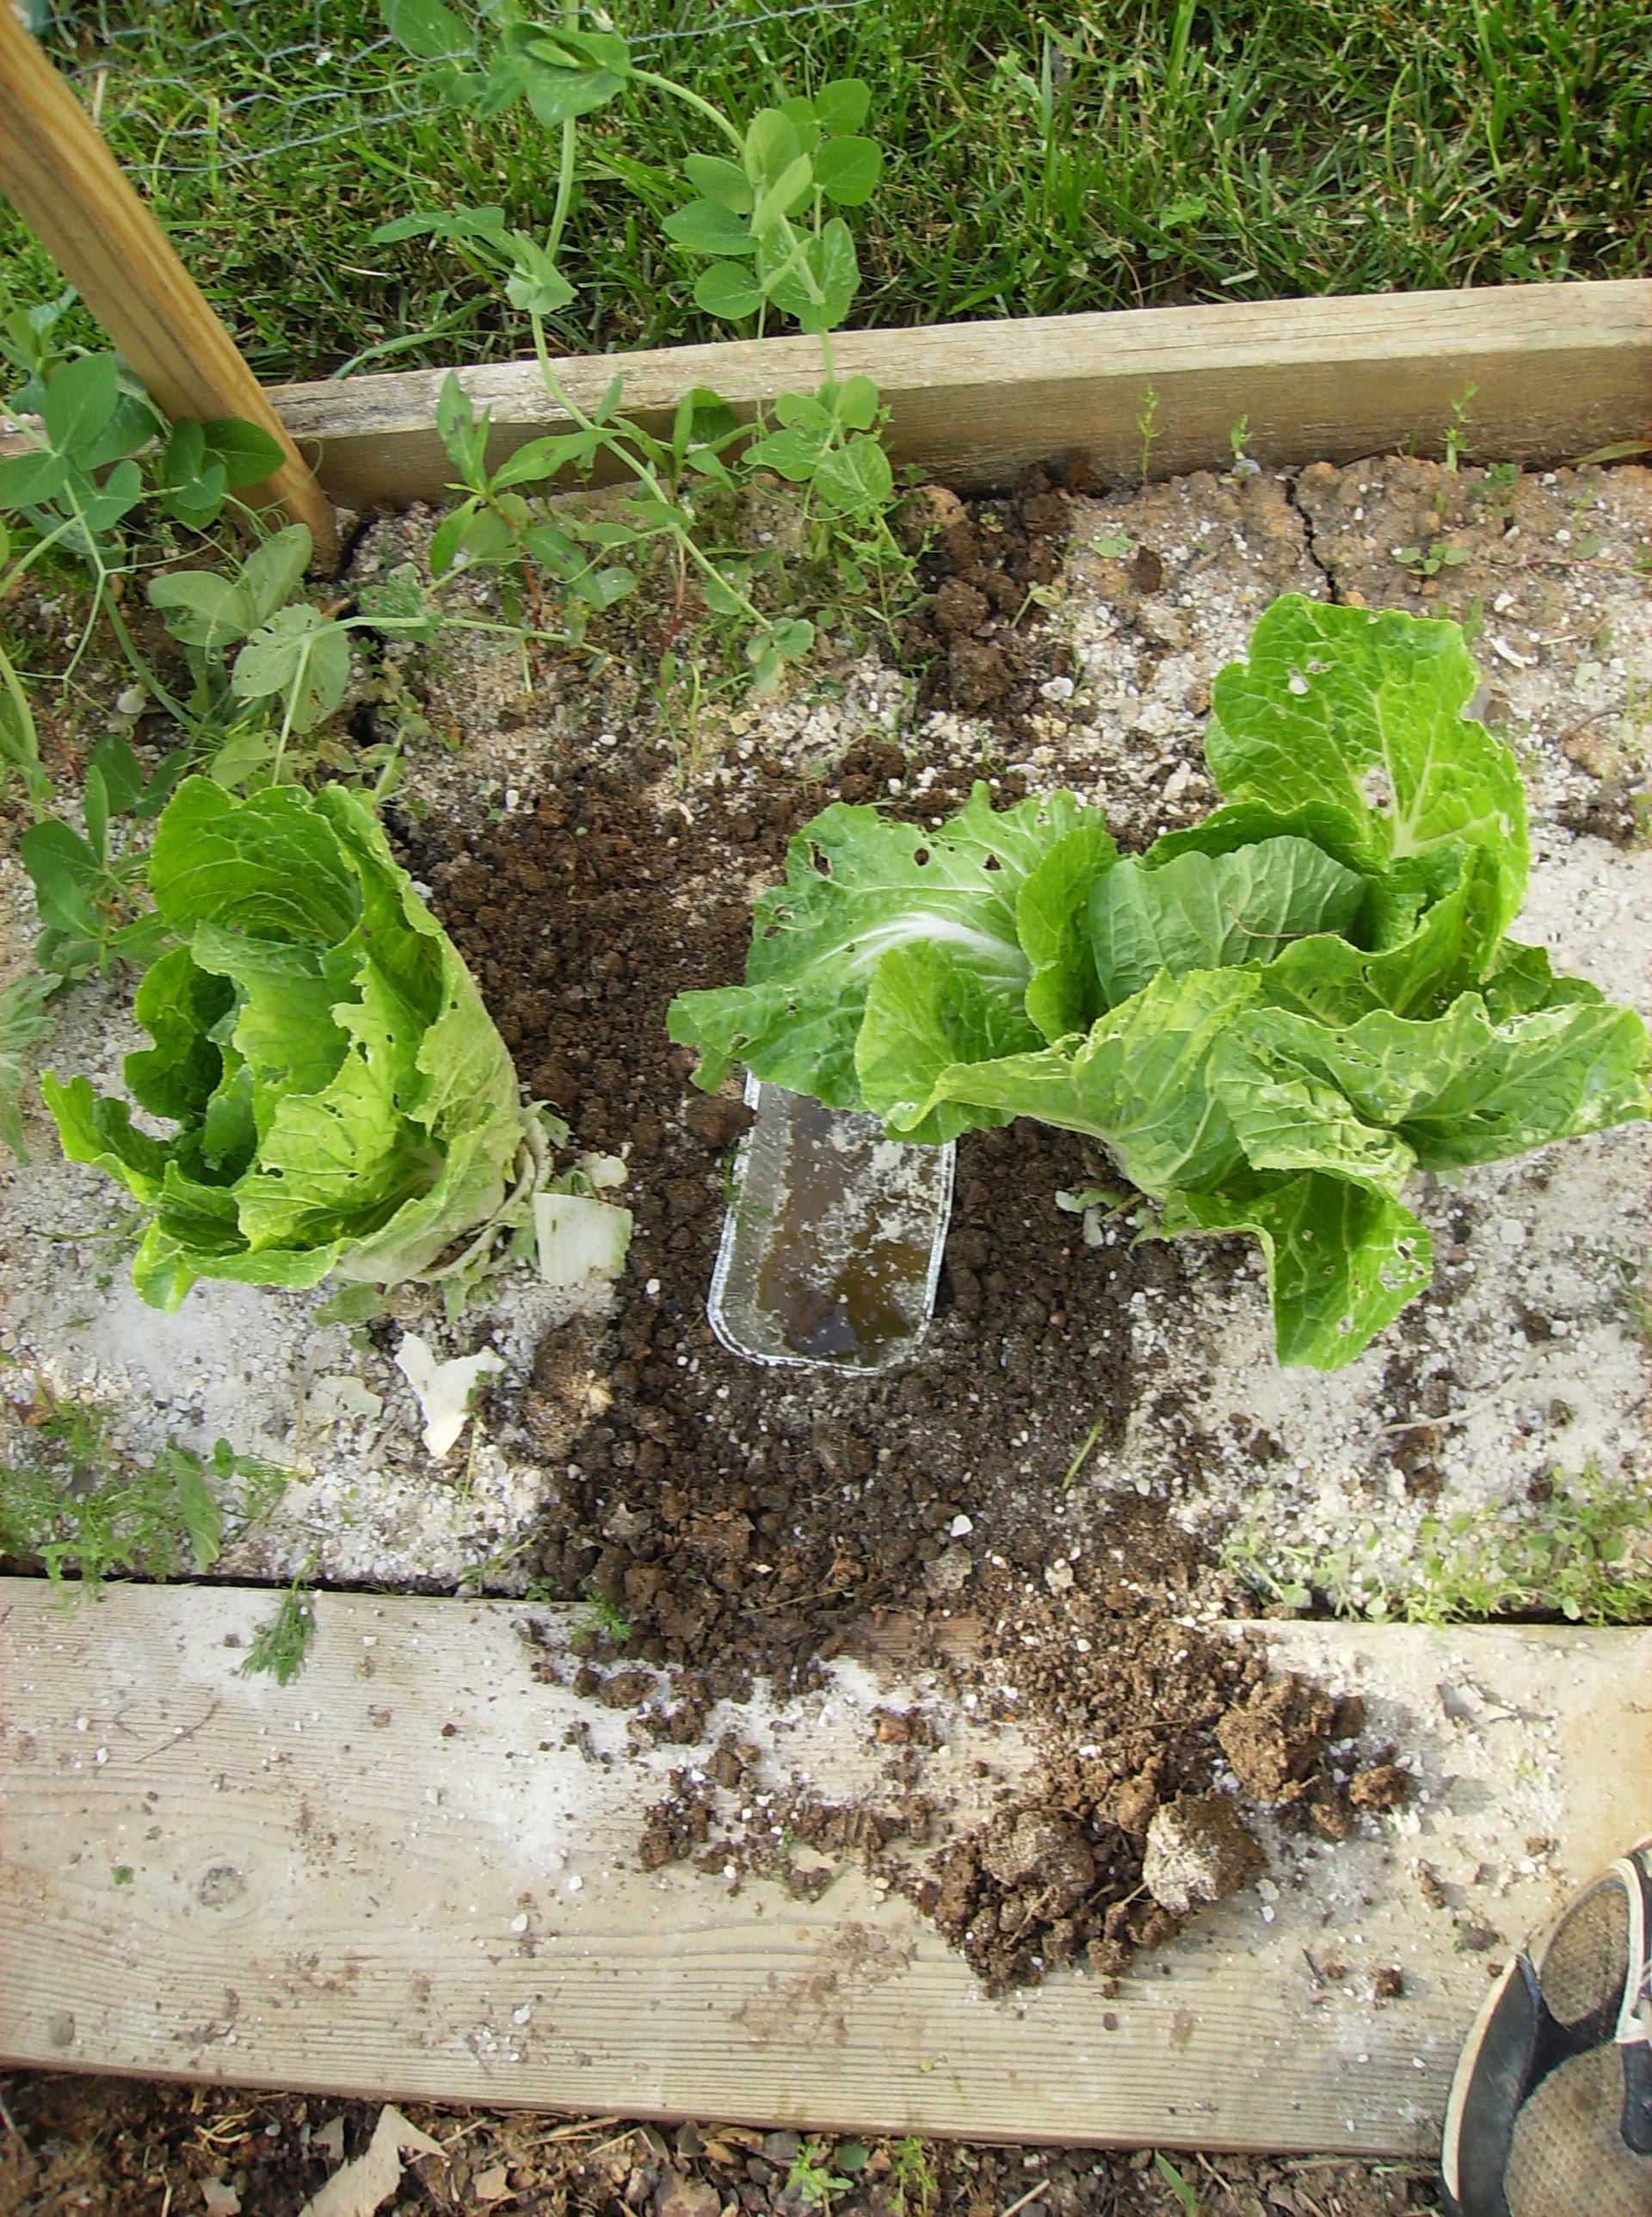
Peas and Bok Choy - The Rusted Garden Blog
Maintaining the Traps:
I found I have to change the beer every 2-3 days. Three days might be pushing it. If you wait longer it doesn't do much more than sour and smell bad. Don't forget to add a pinch of yeast to the trap when you change the beer.
Beer traps work well and should be part of your attack in your war against slugs. I have not found a way to kill every slug but found you can really decrease their numbers in the garden with these traps. Yes, toss out the dead slugs and beer when you put in fresh ingredients. The compost been is fine. Iron phosphate is a great tool against slugs and snails. I use it now more so than the beer traps. It is less work for me.
How to Use Iron Phosphate to Battle Slugs and Snails
As I mention, I am going to catalog the entire 2013 garden season. I am currently dealing with very cold nights where the frost is much harder than it should be. Plastic cups can provide you with a tool that will help with: (Notice two types of cups in the picture)
Plastic Cups have 3 Garden Uses - The Rusted Garden Blog
Protecting your cool weather plants from frost
Getting your warm weather plants out earlier into the garden
Protecting all your plants from snails, insects and rabbits while they establish
The video provides details for using three kinds of cups and it details some pitfalls you need to watch for as the garden earth warms and the days get warmer and as the sun becomes more intense. You don't want to bake your plants!
The cups create micro-climates the help with frost protection and in getting warm loving plants established. Based on the earth's temperature, day temperature and sun's intensity you may need to poke holes in the cups. The cups also provide a basic protection from 'garden critters' while the vegetable plants are establishing themselves.
So... I apologize for the expletive but come on! My third 25 degree night or colder here in the suburbs. My shelf greenhouses are filled minus the tomatoes that bit the dust to the frost last week. Most of my plants can handle a few degrees of sub-freezing weather but tonight will be 25 degrees or colder. I am already 3 week behind planting.
Morning Light Snow - The Rusted Garden Blog
I appreciate some of the feedback I got from my last video and posts. Everything from xmas lights to small kerosene lanterns or jarred candles as additional heat sources. I decided just to go with letting today's sun warm the inside of the units as much as possible and I simply wrapped it up. It already had a 2nd layer of plastic around it. I added a very heavy quilt on top and another layer of plastic around it. I just need to keep it around 29 degrees.
Heat Rises - A Heavy Quilt and More Plastic Wrap
My goal is to protect the plants inside as to there is no stem or root freeze. We will see. I was also lucky enough to wake up to a light snow. I am in Maryland Zone 7 and the day temperatures are suppose to average mid 50's and the night upper thirties. It hasn't been like that for the last several weeks and this week is no better. Today was about 35 degrees.
Plastic Cups for Some Frost Protection - The Rusted Garden Blog
I have plants in the ground that are all cold weather plants. They can frost and freeze a bit. However, I don't want them to have leaf damage or worse. The plastic cups do create a few degrees of protection and the earth is well above freezing. I am actually going to fill my watering can with hot water tonight and douse them around 10 PM. The water will cool quickly as not to harm them but it might provide and hour or two of warmth which I define as above 32 degrees. We will see. Here are the pictures of my first battle with Mother Nature.
How to Build A Low Cost Basic Garden Vegetable Trellis
Why Build a Vegetable Trellis?
A vegetable trellis will give you more room in your garden to grow vegetables. Vine crops will grow up the trellis and not take up space sprawling along the ground. The trellis also creates a shade area. If you garden in a hot zone, you can now create a micro-climate for cool weather crops beneath the shade of the trellis.
A Finished Garden Trellis - The Rusted Garden Blog
By using trellis shade, you can extend the season for cool weather crops like lettuces and other greens. The shaded cooler area will slow plant bolting. One way to get diseases in your garden is to have little air circulation and sprawling vines. The trellis allows more air movement in your garden and this benefit helps to quickly dries the leaves of the vines. The trellis aids in creating two good conditions that help prevent diseases and the spread of diseases in your vegetable garden.
The Trellis Materials
I bought these at a home improvement store. A bag of six - 6 foot bamboo canes at $2.97 a bag. The chicken wire measures 24 inches by 10 feet and it cost $7.00. A trellis is an inexpensive way to increase space in your garden.
Trellis Materials - The Rusted Garden Blog
STEP ONE: Unroll the Chicken Wire, Walk on It, and Bend It in Half
Unroll the chicken wire and walk on it. Chicken wire wants to roll back up and it can be difficult to handle with just your hands. The best way to handle it is with your feet and hands. Once it is unrolled, fold it over to create two five foot sections. Make sure you walk on the crease of the fold and firm it down.
Roll Out Chicken Wire - The Rusted Garden Blog
10 Feet of Chicken Wire - The Rusted Garden Blog
Fold and Crease - The Rusted Garden Blog
STEP TWO: Weave the Six Foot Bamboo Poles Up the Sides
Follow the picture below and use four bamboo poles to weave up the sides of the chicken wire. Insert the pole, starting at the bottom, and weave the pole through every 5th or 6th hole. It does not need to be exact. Leave about 2 inches of bamboo pole on top of the trellis and leave the rest of the length on the bottom. The excess pole length is what gets inserted into the garden earth.
Weave Pole Through Chicken Wire - The Rusted Garden Blog
2 Poles In - The Rusted Garden Blog
4 Poles In - Length at Bottom is for Ground
STEP THREE: Insert the Trellis Into the Garden It is important to leave several inches of pole at the bottom of the trellis (see above picture). That is what you will insert into the ground to anchor your trellis to the garden bed. The trellis can be opened to any length but I recommend a minimum of a 3 foot opening in the base of the trellis. Tie the tops of the poles off as pictured below.
Placed and Sunk in the Garden
Tie Off Tops for Added Support - The Rusted Garden Blog
STEP FOUR: Plant Your Vine Crops at the Base
You can plant your vine crops on the inside or outside of the trellis. Make sure you position your trellis in a way that it is easy for you to reach in and pick the vegetables. You can grow anything you wish as long as the single fruits stay under 2 pounds. If you grow heavier crops you will have to figure out a way to support the heavier fruit. You might use a 5th and 6th pole up the middle of each side of the trellis for heavy loaded vines. A nice shade area will be created beneath the trellis. You can plant lettuce, spinach, radishes, or other vegetables that prefer cooler temperatures. The shade slows down the bolting process.
Plant a the Base of the Trellis - The Rusted Garden Blog
Three Finger Method to Pruning Tomato Plant Suckers
(Some Benefits of Pruning)
What is the Three Finger Method?
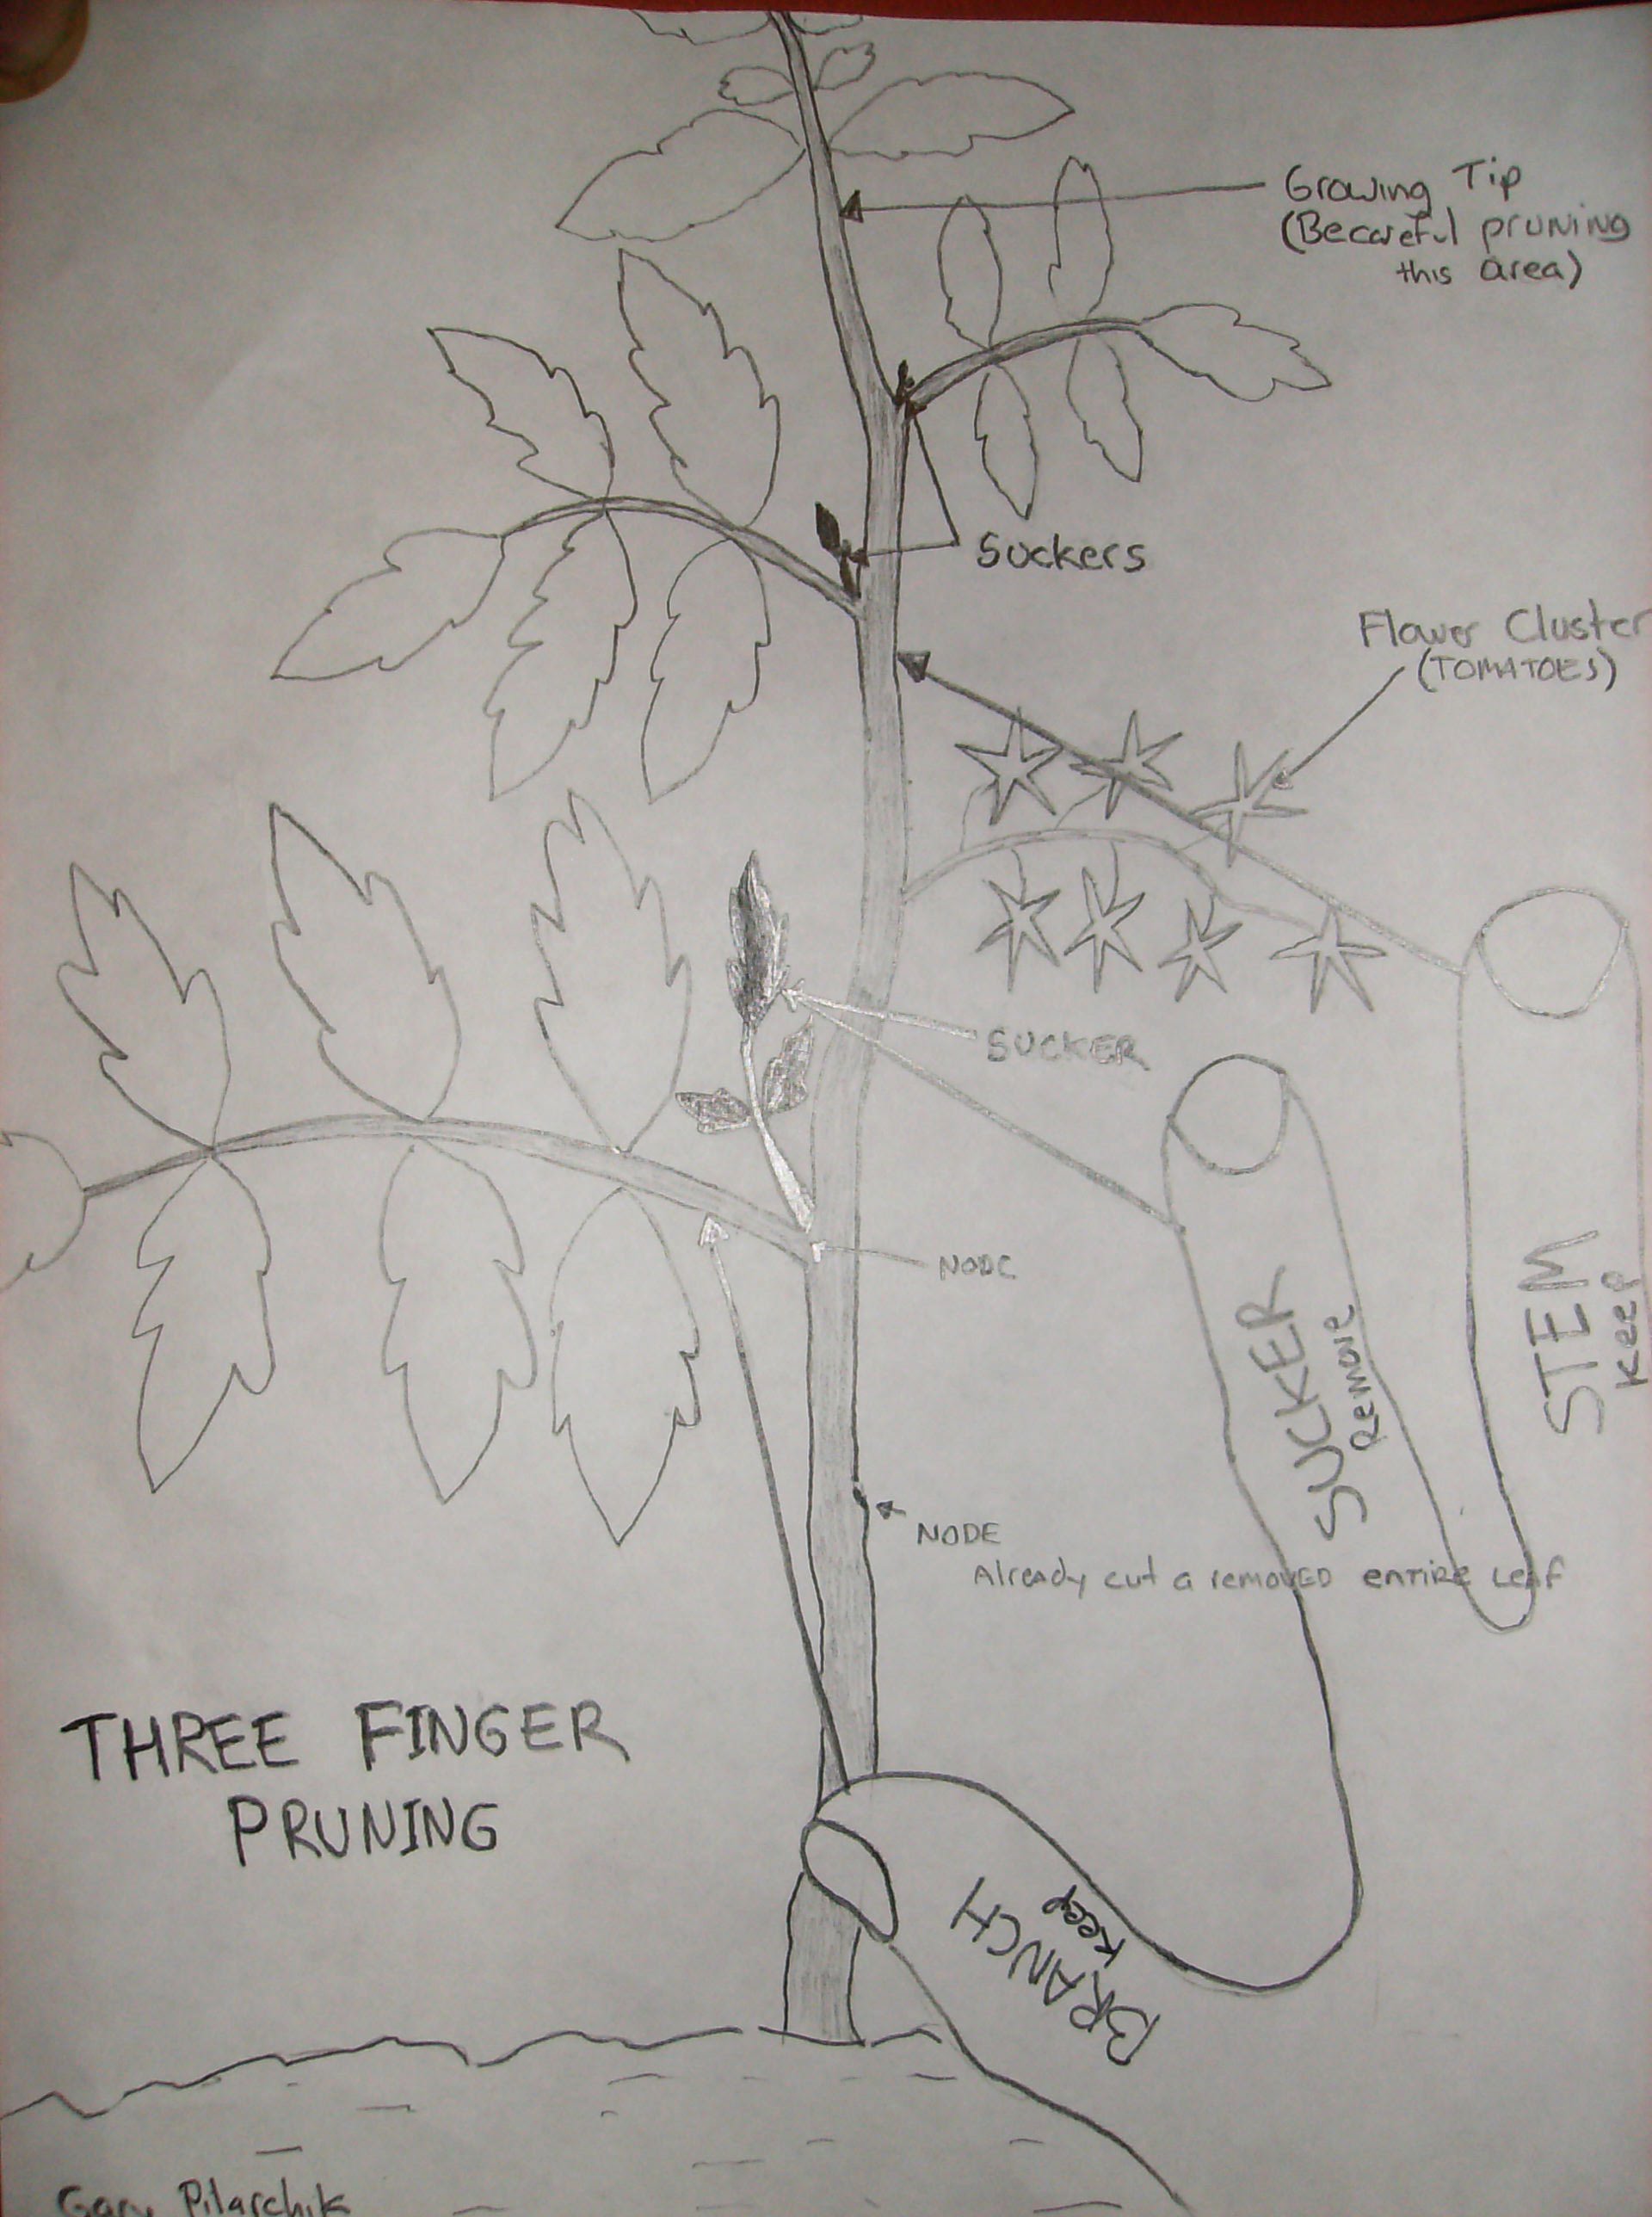
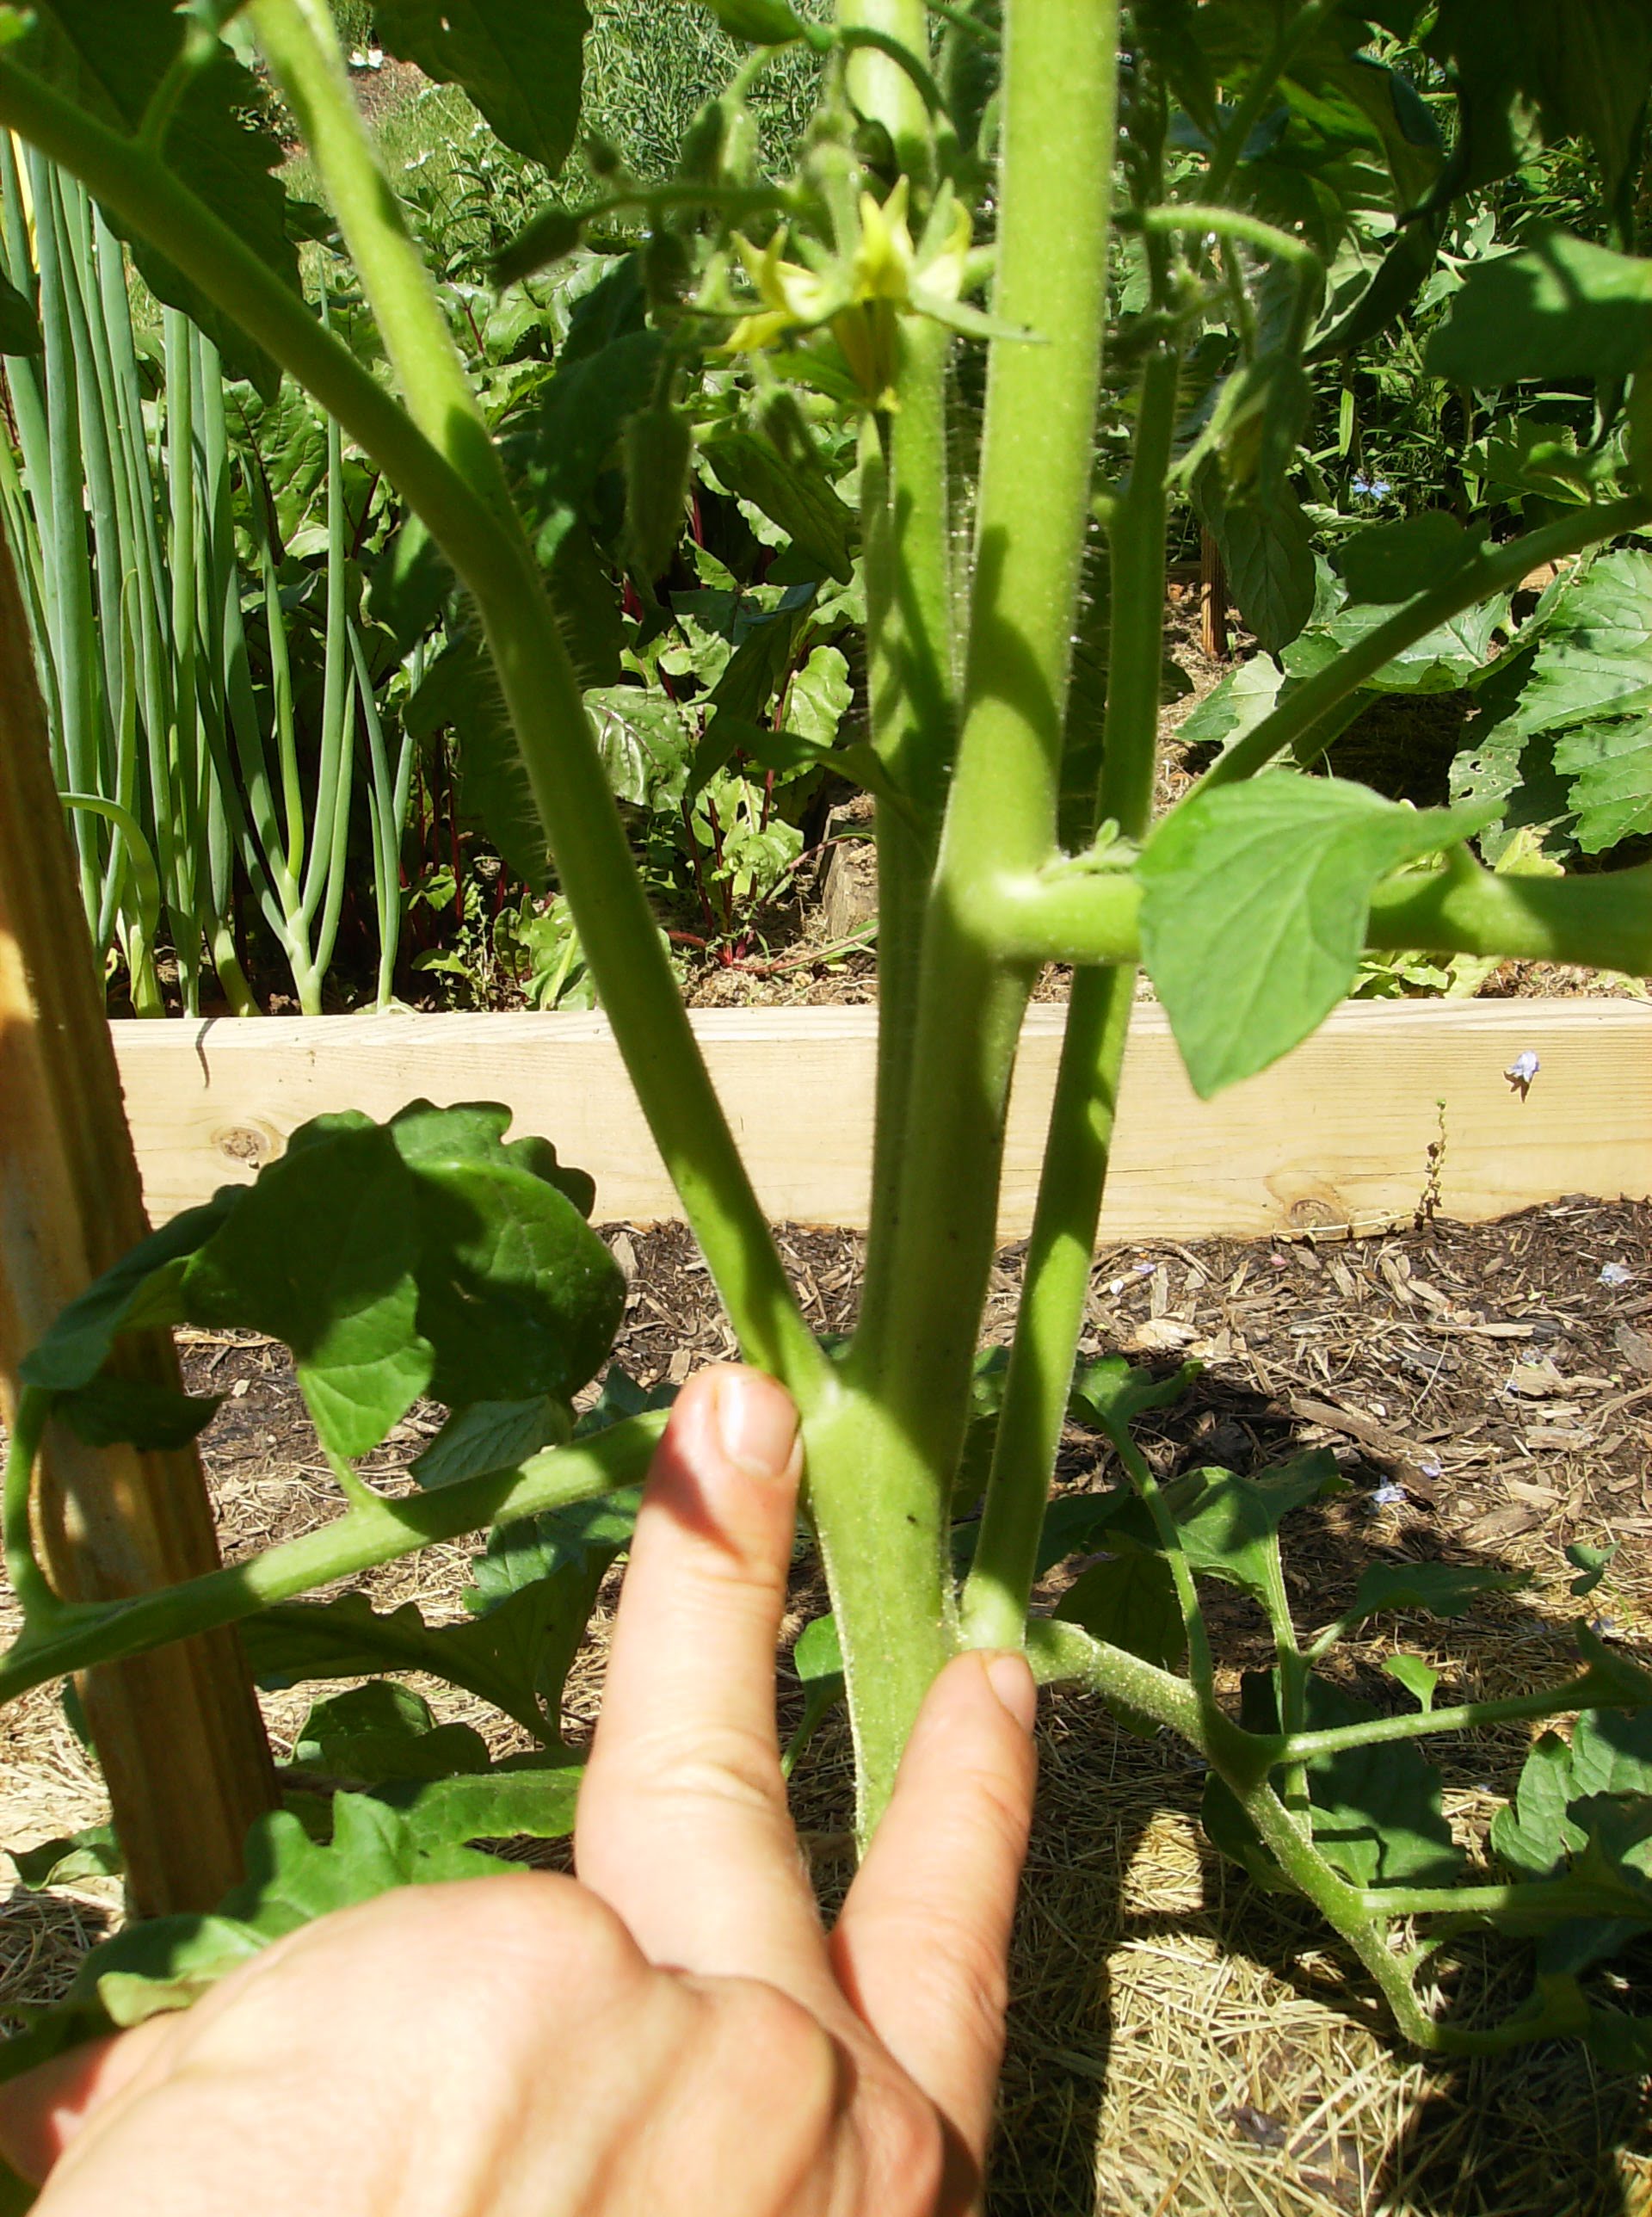
Make a peace sign and extend your thumb at the same time. You should have your thumb, index finger and middle finger extended. Your ring finger and pinky should be closed. The three extend fingers represent a tomato plant. Your thumb is a leaf branch (the branch to keep), your index finger is the sucker branch (the branch to remove) and your middle finger is the tomato stem. I drew a picture to further explain the principle. When in doubt and in the garden, throw out those three fingers and compare it to the tomato section in question.
Keep in mind you typically only prune indeterminate tomatoes and not determinate tomatoes. You prune indeterminate tomatoes as to help keep and maintain the tomato vine that would naturally, if left alone, grow out of control.
Tomato Pruning - The Rusted Garden Blog
Identify the Sucker Branches and Remove Them
The branches aren't really sucker branches but giving them a name makes it easier to explain pruning. If they continued to grow they would grow into a vine branch - a branch from the main stem. It would flower and set tomatoes along with the main vine.
A tomato plant is pruned to typically maintain one vine (sometimes two of more) and that will help to develop a strong healthy tomato plant. Sometimes I maintain two vines when I plant a new variety of tomato. That is just my preference. You may chose to let the main stem of your tomato branch into two or three vine branches.
Pruning tomatoes theoretically reduces the number of tomatoes a plant will generate or produce. However, pruning typically means the tomatoes that do grow - grow larger and it significantly helps to prevent diseases and mildews. If you don't prune there is a greater chance for diseases and you might lose the plant and all those extra theoretical tomatoes. You want to maintain good airflow through your plants and let the sun dry them quickly after rains. Pruning suckers helps with this.
If the sucker branches are left to grow it gives an illusion of a healthy green leafy tomato plant. In reality, come another month, a gardener ends up with a plant that is hard to tend and contain in the garden. An unmanaged tomato will have more leaves than needed and the plant will be at greater risk for disease as mentioned. They can grow and become unruly. It sounds counter intuitive but a little less (removing branches) is more when pruning and tending a tomato. I am pointing out two sucker branches in the picture below. You will notice a third sucker branch if you have a sharp eye.
Tomato Suckers - The Rusted Garden Blog
These sucker branches are large and that is what makes pruning difficult. It's not that they are hard to remove but that they look so healthy, many gardeners are tempted to let them grow. Don't. Prune them with a knife or snap them off if they are small enough. When my tomatoes are first growing, I am a little slower to prune them. I let some leaves, I would normally remove, hang around a bit in May. After that, they are gone. I do it to provide more photosynthesis to the newly planted tomatoes. It may or may not make a difference but it works for me. You want to slowly prune your tomato as to keep it managed but not remove so many leaves that you slow its growth or put it in a bit of shock.
Pruned Tomato Sucker - The Rusted Garden Blog
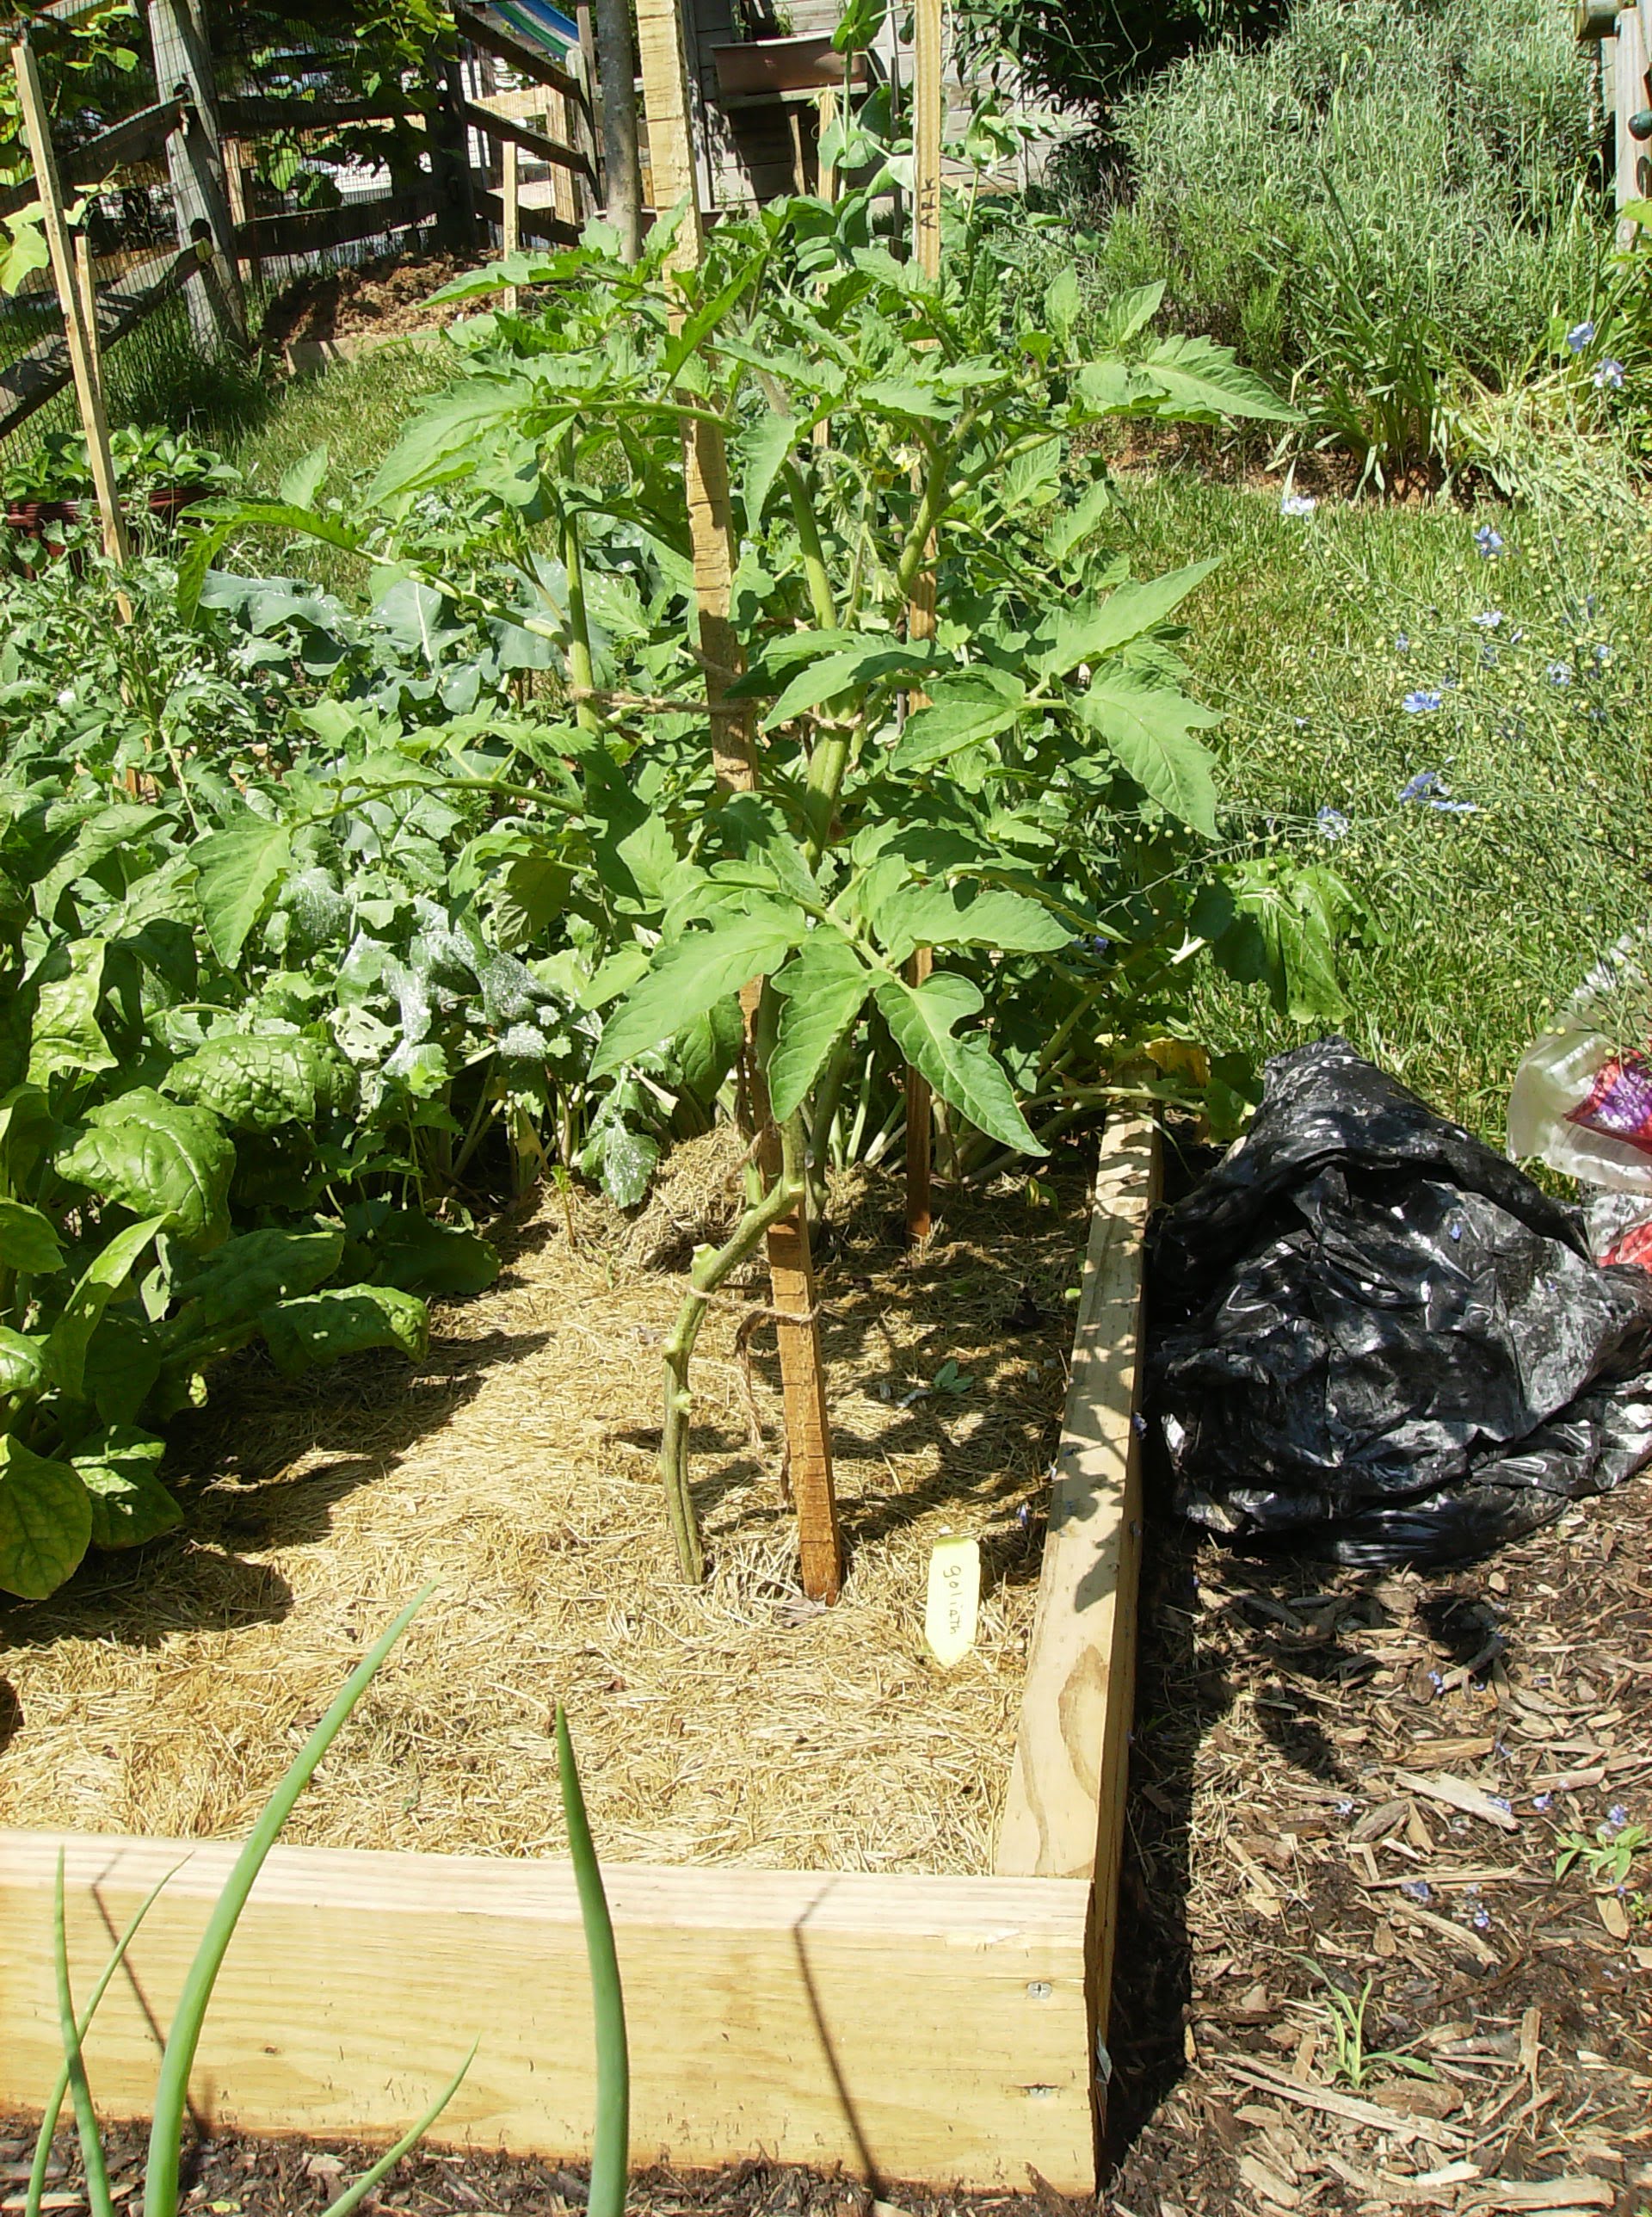
The sucker branches have been removed. The tomato still looks fine. You will notice my fingers point to the empty spaces where the sucker branches were and you now only see two leaf branches. I also remove bottom branches when the tomato is large enough. This creates a splash barrier and helps prevent the spread of soil borne diseases.
Here is another one of my plants pictured below. It gives you an idea of plant size and the amount of space I keep between the leaves of a tomato plant and the ground. If you enlarge this picture you will also notice two branches coming off the main stem. This is one case where I am growing essential two vines or allowing the main stem to branch into two. I will prune and maintain both of the main growing vines.
A Pruned Tomato - The Rusted Garden Blog
Why Prune Tomatoes?
Tomatoes don't have to be pruned but I recommend you do prune them. Tomatoes will still grow if the plant is left to sprawl across the ground without any care. That is what they are designed to do. However, if tomatoes are left to sprawl, they will be more susceptible to disease and mildews. More garden space is needed for a sprawling tomato plant and you probably won't get that many more tomatoes then a well pruned and tended tomato plant.
You prune a tomato plant to greatly reduce the risk of disease and mildews such as blights and powdery mildew. A pruned tomato plant creates a gap between the soil and leaves. It is harder for spores to splash to the leaves and take hold. A pruned plant has less leaves which allows air to circulate through the entire plant.
Better air circulation quickly drys leaves. Dry leaves are a good strategy in reducing the spread of disease and mildews. You prune a tomato plant because you will still get a large harvest of tomatoes without sacrificing space in your garden. A tomato that grows up a stake and has its growth managed, allows more room for more vegetable plants. In my book of a gardening the more space the better. In super summary, you prune to have healthier larger tomatoes and more garden space. It's that simple.
I will be doing two monthly updates of my garden as 2013 progresses. This is my first update. I will be adding in several garden tips and tricks within the updates to help make the videos a little more valuable toward your time.
It is mid march and because we have had unseasonably colder temperatures, I am about 2 weeks behind in planting and my greenhouse shelf units have filled up with plants. This week we will be having two 25 degree nights. That is just too cold. A little frost is fine for cool crops but 7 degrees below freezing is a lot. I did push my beets, lettuce and kohlrabi into the ground. I made micro domes out of cups to keep them from freezing through. I hope it works!
The tips I discuss are:
Using plastic cups for frost protection
Thirty minutes of sun an wind to 'toughen-up' your tomatoes
Black painted milk jugs to hold heat
Perennial beds to bring in good bugs
And a couple other things.
I hope you enjoy the short tour of my garden. I wish you luck and success in your 2013 gardens!
Snails and slugs once devastated my vegetable garden. Iron phosphate helped me greatly reduce the populations of these pests. I feel it is the safest most effective product out there for controlling snails and slugs.
It works by baiting iron phosphate into water resistant pellets. The snails and slugs are attracted to the bait scent, ingest the iron phosphate, return to their homes and die. Iron phosphate disrupts digestion and the pests stop feeding and die off in a few days. A pretty simple process.
The amount of iron phosphate introduced to your garden is negligible. As I show in the video the 2 pound package I have is 1% iron phosphate.
The best way to use this product is before your garden is full of lush green growth and before you see damage. It gets scattered in your vegetable garden and perimeter. I recommend putting it out now or when your days and nights start to warm into the 40's.
I scattered it today, mid March and will do it again in the beginning of April and probably a third time around the end of April. After that, I will use it about 1x a month to maintain a low population of snails and slugs. You can't wipe them out but you can control them.
What Does 10-10-10 and N-P-K Mean to Me and My Garden?
You will see 3 bold number on every bag of fertilizer. A typical set of bold numbers is often 10-10-10. The bag will also have a weight. It may be 2 pounds, 5 pounds 10 pounds or 40 pounds. The numbers are the amount of key MACRO nutrients. Your garden also needs MICRO nutrients but that will be a subject of another blog entry.
The 3 bold numbers represent N-P-K. Always in the same order or Nitrogen (N), Phosphorus (P) and Potassium (K). The numbers represent the total percent of the the weight that is either nitrogen, phosphorous or potassium.
If your bag of fertilizer reads 10-10-10 and weighs 5 pounds you have...
10% of the 5 pounds is Nitrogen (N)
10% of the 5 pounds is Phosphorous (P)
10% of the 5 pounds is Potassium (K)
If your bag of fertilizer reads 9-12-12 and weighs 40 pounds you have...
9% of the 40 pounds is Nitrogen (N)
12% of the 40 pounds is Phosphorous (P)
12% of the 40 pounds is Potassium (K)
The macro nutrients are essential for healthy garden plants. Micro nutrients also play a key role in the health of your vegetable plants. One benefit of clay soil, like mine, is that clay soil contains a whole light of micro nutrients. This is some of what the macro nutrients N-P-K do for you vegetable plants.
Nitrogen
Heavily used by vegetable plants
Provides the green and green leafy growth
Essential for photosynthesis and chlorophyll development
Phosphorous
Also needed for photosynthesis
Important for root development and plant flowering
Seeds are essentially embryos. Cotyledons form the embryonic leaves. Botanists classify plants based on the number of cotyledons or leaves. I think. Sorry, I am not a botanist. What I can tell you for tomato seedlings is that the First Leaves to emerge are not True Leaves. They break the surface and are part of germination geared towards establishing the tomato. They are simply called first leaves. In this case a picture is worth a thousand words.
First Leaves but Not True Tomato Leaves - The Rusted Garden Blog
These first leaves to emerge do not have a basic tomato leaf shape. The edges are not scalloped or broken in any way. True leaves for a tomato seedling are the second set of leaves to develop. They typically show up 10 days after germination or 14-21 days from planting the seeds. True Leaves for a tomato typically have the tomato leaf shape we are accustomed to seeing. Here is another picture to show you the actual true leaves of tomato seedlings. Notice the difference in shape.
True Leaves of a Tomato Seedling - The Rusted Garden Blog
True leaves let you know it is time to start considering transplanting the seedlings into larger containers. When you decide to transplant and how you transplant them is a personal choice of technique. Typically, tomatoes are transplanted 3-5 weeks from the original seed planting date.
Another 60 Second or Sow Video on Identifying First Leaves and True Leaves on Tomato Seedlings
Basically, you are recycling two black plastic garden containers. This is designed for smaller potatoes. You will use 1 or 2 small potatoes based on the size of the containers. You can use 1, 2 or 3 gallon containers. Whatever you can get to recycle will work fine.
The video shows the whole process. It shows your how to construct, plant and harvest using this 2 container systems. You are creating an insert bucket with sides that fold down. You can check on the growing process and harvest the potatoes from the sides of the buckets ANYTIME you want potatoes. Once they are growing of course. A great design for your deck or around your garden beds!
Two Types of Potatoes for Buckets - The Rusted Garden Blog
The best answer is the simplest answer. When it gets warmer the plants move from leaf or vegetable production to reproducing. Radishes get woody. Greens get bitter. Broccoli flowers. They do this to typically create seed heads or seed pods. The cool weather is the time for them to grow and mature. The warm weather is time for them to bolt and produce seeds. Some vegetables will grow all season long but can handle the cold and frost, so why not get them in the ground and to your table as soon as possible!
What are the cool weather months in Maryland?
There are two cool weather season: Spring and Fall. The spring cool weather season is roughly the beginning of March through the end of May. The fall cool weather seasonismid to late August through the the end of November. If you use a cold frame you can start the season earlier in the spring or prolong it in the fall. A lot of vegetables prefer the cool weather and grow best during those times.
Vegetables that Like The Cold - The Rusted Garden Blog
Some of the cool weather crops to consider:
Radishes
Lettuces of every type and don't forget Spinach.
Kale and Collard
Kohlrabi
Peas
Swiss Chard
Broccoli, Cauliflower and Cabbages.
There are more cool weather crops. Some of these plants are best planted directly from seed and some are best planted as transplants. This varies a little based on your planting zone. Maryland is zone 7. You can purchase transplants from your local nursery or garden center. You can also grow them indoors from seeds. In the case of lettuces, I plant both seeds and transplants. Seed starting in doors or using transplants helps get garden produce to your table as soon as possible. Transplants will mature to table as your seeds take hold. March is the time to plant. You don't have to wait for the warm tomato weather to start planting your garden.
Shouldn't I worry about frost?
Yes and no. All of the vegetables I mentioned can handle frost as seeds. Most of them can handle frost as seedlings. Many of them can handle light frost as plants. Some plants can actually freeze. Some of them taste better with a light frost. I have kale, spinach and onions that made it through the entire freeze of winter. As we go through how to plant each vegetable, I will talk a little bit about frost and freezing.
The real risk of damage is consecutive days of all day freezing temperatures. Even a little snow won't matter. Your are looking for mostly 35+ degree night and 45+ degree days as the starting signal to plant. A couple hours of freezing temperatures at night and frost won't do much damage. It is extended freezing periods that cause harm.
Preparing your garden
I clear out old plants and refuse. I turn the soil over and break up clumps to about a depth of 12 inches. I do not fertilize at this point. The best thing to do is to clean up your garden and turn the soil over on a day when it isn't too muddy or too frozen. That's pretty much all you need to do to get started for the cool weather of spring.
Planting Radishes
Radishes need loose soil to about a depth of 8-10 inches. They can be planted once the soil can be worked. Most radish types mature within 25 to 30 days. Radishes should only be planted as seeds and there are dozens of radish seed types at your local garden centers. I recommend buying several varieties.
Basic Radish Rows - The Rusted Garden Blog
Plant your radishes in rows at a length of your choice. Plant them about 1/2 inch deep. You should cover them with fine soil. Just make sure the soil isn't too clumpy. The seed packets will have directions if you want exact details. I plant each seed 1/2 inch to 2 inches apart across the entire length of the row. The variance in spacing is based on the size of the mature radish. Smaller radishes can be planted more closely together.
I space my rowsabout 6 inches apart. I have never had trouble with radishes maturing this way. The trick is to harvest some radishes early and harvest every other plant. This way you get to enjoy some baby radishes and you give the others space to fully mature. You can crowd the seeds a bit and thin if you want.
Different Types of Radishes - The Rusted Garden Blog
Some radishes grow bigger than your basic round radish such as 'White Icicles'. You can plant larger growing radishes the same way as I described but you will need to thin the plants earlier to be 1-2 inches apart when the plants reach about1-2 inches in height. I would check the seed packs of larger radishes for information on thinning and spacing.
If you want to have radishes through the month of May, plant new rows every two weeks starting in March with your last row being planted during the first week of May. You don't want to sow so many radishes in one planting that you end up with too many to eat in one harvest. The good news is radishes last longer in the ground when the day temperatures are cool. Once it get's warm they get woody.
A little frost typically isn't an issue with radishes. Even it is, by planting every two weeks you will get a good crop if the first fails. I have never had a crop fail even with a frost.
Planting Lettuce
Lettuces should be planted as seeds and as transplants you start indoors. This way your garden produce will come more quickly to your table. Pick out whatever types of lettuce seeds you want. I plant lettuce seeds around mid March. One way I plant them is in a two to three foot row and I disregard the seed packet directions. I dig my rows no more than a 1/2 inch deep and sprinkle seeds into the row so the land about 1/4 inch apart. I pay no mind if they touch. I probably drop 25-35 seeds into a row. I cover them with fine soil. Lettuces should be planted in soil that was loosened to a depth of 8-10 inches.
I plant the seeds this way because lettuces grow fast when the weather hits the right temperature. When the seedlings reach 2 inches tall, I carefully dig them up when the soil is more dry then wet. I space the seedlings out using a minimum of 4-6 inches between plants and I tuck the transplants into spaces all over my garden. Wherever there is space there goes a lettuce transplant I grew from seed. This is just one way to plant lettuces. My transplants are the thinned out lettuces.
Lettuce, Chard & Radishes - The Rusted Garden Blog
Most types of lettuce can withstand frost and can actually freeze. I have watched this happen over and over again as my Fall crops hit the November and December freezes. Essentially, lettuce can freeze and freezing does not destroy/burst the plant's cells. So when it warms up, the lettuce is unharmed. Eventually, continued freezing temperatures will kill it. That is usually due to the lettuce roots freezing. So some frost and even freezing is okay.
Because lettuce can withstand some frost and leaf freezing, I also buy lettuce transplants from my local garden center and grow my own. I look for different varieties and get them out as soon as possible. The lettuces you buy as transplants should be healthy looking (of course) and 3-5 inches tall. I plant them about 6 to 12 inches apart in my garden. The larger spacing is because I am growing them to full maturity. If you want to grow baby lettuces or 'cut and come again lettuce' you can plant them closer.
Different Ways to Plant Lettuce Including a Scatter Plot Method
I also plant them closer together, as mentioned, because I harvest a lot of lettuces when they are young as 'cut and come again'. A good tip is to cut the lettuce off at ground level and leave the roots in the ground. Most lettuces will grow new leaves and you can get several harvests from them.
Mixing up seeds and transplants will get you more produce. As my lettuce seeds I planted first, grow to 2-3 inches, the transplants from the garden centers are maturing for harvest. This way I get more lettuces to my table through the cool spring season. There are many ways to plant lettuce. I am just suggesting a few ways that work for me.
Planting Spinach
The best way to plant spinach is to turn the soil to a depth of 10-12 inches and plant seeds. I poke a hole in the ground with my finger to about 1/2 inch. Again, the seed packets will give you details but they usually say plant rows. I don't plant them in long rows.
I create a roughly shaped box that is typically 24 holes by 24 holes. I make my holes 1 to 1 1/2 inches apart and typically create a box-like or square planting in the ground. I drop in 1 seed per hole and cover with loose soil. If you a growing large leafing varieties, you can space the holes 2 -3 inches from each other.
Frost and freezing doesn't seem to bother many types of spinach. I have green spinach now that survived the entire winter above ground. It stopped growing during the winter but the green that was there in December stayed until March. It is now growing and getting bigger. I suggest you do a couple of plantings of spinach every two weeks up through April. I used to think spinach transplants were unnecessary but they work well. If you plant on seed per cell, you can get some plants into the garden that will mature nicely as you what for you seeds to take hold and grow.
Planting Kale and Collards
From experience, kale and collards are easily grown indoors and make great transplants. Start them indoors 4-6 weeks early. Most kale and collards get quite large and need to be planted 12 to 18 inches apart. Kale and collards are great to grow because the can be harvested one leaf at a time or in bunches. There are dwarf variates if space is an issue. I plant them as transplants as to get mature plants in the ground but for a household of four you really don't need any more than 4-6 plants of any one variety. They get large.
Kale Transplants I Grew - The Rusted Garden Blog
Kale and collards are biennials. That means they will grow spring, summer, fall, winter (if mild enough), spring again and flower. I eat the flowers of my second year kale and collards and they are delicious. With some care and pest management you can eat call spring-fall in Maryland. The first year plants don't bolt and flower like other cool season crops.
Over Winter 'Red Russian' Kale - The Rusted Garden Blog
Planting Kohlrabi
It is described as an above the ground turnip with a cabbage broccoli type flavor. I plant them as seeds and as transplants I grow. They look very much like kale and collards as the are growing up but form a great tasting baseball size bulb above the ground. You can eat the leaves too.
Picked Kholrabi - The Rusted Garden Blog
You should thin them to the directions on the seed packet when the plants are 1 to 2 inches tall. The get quite large. They like the cool weather so you can get them in the ground in later March. I plant my transplants 4-6 inches apart as top get a nice large apple sized root. It is above ground remember.
Planting Peas
I love peas. There are basically two types. Peas that you eat in the pod and use whole or peas that you take out of the pods and just eat the peas. Or better known as edible pods or non-edible pods. You can go to a garden center and buy what every you like. You plant peas can plant peas as seeds or transplants. I once believed they could not be planted as transplants. I experimented and was wrong.
They like loose soil. I plant my peas 1 inch deep and space them 2-4 inches apart when putting them in the ground. I use my index finger to make the holes. I typically plant them along a chicken wire trellis as peas MUST have something to climb up. I also plant peas in containers and I have a video that shows you how to do that. Containers are great to use because you can plant them sooner while the garden beds warm up and dry up. Peas don't do well in cold soggy earth. They rot.
Grow Peas in Containers: Planting to Picking
Peas can handle light frost but really can't handle freezing. But they too can be planted as soon as the soil can be worked and really only pop when the time is right. Two plantings of peas, 2-3 weeks apart will work best for continued production.
Planting Swiss Chard
I grow 'bright lights' swiss chard. It is a great green that will grow spring till fall. It doesn't bolt either and you can keep harvesting it the entire growing season. I typically start them indoors or buy transplants. They can handle a light frost and can go in the ground as soon as it can be worked.
Mature Swiss Chard - It's a 3 Season Garden Vegetable
They grow quite large and should be planted with spacing like you would use for kale and collards. I plant mine at about 12 inches. In the above picture, they are the 4 plants closest to the front. I have 4 plants in a 4 foot row.They look like leafy greens with some red on the stem. The stem is great in a stir-fry too!
Planting Cauliflower, Broccoli and Cabbages
I only plant cauliflower, broccoli and cabbages from transplants. Every time I tried to plant cauliflower and broccoli as seeds (in Maryland) they did not mature quick enough before the warm weather arrived and they bolted. They flowered and I did not get to eat them. They really like the cold and the sooner you get them in the better. Warmth tends to quicken the flowering of your broccoli and cauliflower.
Transplants work well for all three of these vegetables. Cabbages won't really bolt they just won't get as large. So, I would also recommend using transplants for cabbages to keep them growing in the cool weather. All three vegetable types can withstand frost and freezing. I plant my cauliflower, broccoli and cabbages mid-March and I space them 12-18 inches apart. You have to get these in early because they take a while to mature. And they get large. I tend to plant things more closely together. More spacing is okay. I use a raised bed, so I can plant them closer together.
Watering Your Garden
Keep your garden well watered using a gentle spray. The last thing you want to do is blast the seeds or seedling out of the ground with a hard stream of water. During the cools season you'll have to water about every second or third day when you get consecutive sunny days. If it is cloudy the soil tends to stay moist. Just don't let the seeds and seedling dry out or create pools of soggy soil.